A great preventive maintenance checklist helps standardize routine maintenance work. This comes with a slew of benefits: it helps reduce downtime, extend asset lifetimes, and improve safety.
In this article, we break down what goes into a practical PM checklist and outline how to create one from scratch. By the end, you will know all of the common mistakes to avoid — and have a clear template for building any PM checklist.
What is a preventive maintenance checklist?
A preventive maintenance (PM) checklist is a standardized list of actions and checks a tech or operator should follow while performing a specific routine maintenance task. Its purpose is to make sure that work gets done safely and efficiently every time, regardless of who’s performing it.
Here are the essential items that almost every PM checklist should include:
- Basic asset details: Equipment ID and location, and name of the task covered (e.g., “Quarterly pump inspection”) — so there’s no confusion about what the checklist applies to.
- Safety steps: Lockout/tagout instructions, required PPE, required permits, and hazard warnings to protect technicians (if applicable).
- Inspection points: Key components to visually or physically check (e.g., belts, bearings, hoses).
- Lubrication/adjustment tasks: Specific steps for greasing, tightening, or calibration.
- Performance checks: Steps to verify output metrics like pressure, temperature, or vibration against set tolerances.
- Role/skill: The trade or skill level required — e.g., “Maintenance Tech,” “Licensed Electrician,” “Millwright.”
Optional items some PM checklists include:
- Estimated time for completion: This helps maintenance planners and schedulers with job planning, scheduling, and workload balancing.
- Short videos, annotated photos, or diagrams: Visual aids for complex steps or hard-to-locate components.
- Parts, tools, and consumables list: Helps ensure the right items are on hand before starting work.
- Pass/fail or measurement fields: For capturing numeric readings, tolerances, or clear go/no-go results.
- Reference documents: Links to OEM manuals, torque charts, or regulatory requirements.
- Completion sign-off: This is especially useful if you still use paper checklists. Leave space for date, technician name, and any notes on findings or corrective actions needed.
A common challenge when creating a PM checklist is balancing thoroughness with practicality. A short checklist risks skipping important steps; while a long one can be confusing or result in technicians checking boxes without thinking. Look to add the minimum number of steps you can without compromising the safety or reliability of the process.
There are two “types” of PM checklists
Not all preventive maintenance checklists look identical. They can be built with different objectives in mind — like boosting uptime, meeting compliance requirements, or ensuring worker safety.
But regardless of the goal, every checklist should be clear, actionable, and sequential so technicians know precisely what to do and in what order.
Broadly speaking, there are two types of PM checklists.
1) “Pass-or-fail” equipment preventive maintenance checklist
This type is used for simple, go/no-go decisions. The technician inspects or tests a component and marks it as either acceptable or not. It’s fast, standardized, and easy to track in a CMMS.
Examples:
- Emergency stop button: Press the E-stop on Machine A. Does it immediately cut power and halt all motion? (Yes → Pass, No → Fail)
- Forklift tire inspection: Measure tread depth with a gauge. Is the tread depth ≥ 3 mm across the entire tire? (Yes → Pass, No → Fail)
- Backup generator test: Start the generator. Does it reach operating speed within 5 seconds? (Yes → Pass, No → Fail)
- Machine strokes-per-minute: Record the strokes-per-minute at which Machine X is running. Is it between 400 and 440? (Yes → Pass, No → Fail)
Sidenote: If you mark “No/Fail” on any task, some CMMS solutions can be configured to create a corrective work request automatically.
In most cases, these pass-or-fail checks are just one of the steps in a larger PM checklist.
2) “Step-by-step” preventive maintenance checklist
Most PM checklists are sequential: a series of detailed steps outlining exactly how to complete the task. This helps ensure consistency, especially for complex equipment or tasks.
Example of a preventive maintenance checklist
A simplified, step-by-step PM checklist for a quarterly pump service:
- Verify the pump is isolated and locked out.
- Remove guard and inspect coupling for wear.
- Check bearing housing oil level; top up if below mark using ISO VG 68 oil.
- Inspect drive belt for cracks or fraying; replace if > 3 cracks per 100 mm.
- Reinstall guard and ensure all fasteners are tightened to spec.
- Restore power and verify pump vibration ≤ 3.5 mm/s RMS.
How to prepare a preventive maintenance checklist from scratch
Most effective preventive maintenance checklists are grounded in real-world experience and tailored to your equipment. They are built (or at least reviewed) by experienced technicians who actually perform the work — they know the quirks of the asset, which steps really matter, and where mistakes usually happen.
Start by identifying which assets and tasks are worth creating checklists for. Focus on critical equipment (like pumps, compressors, or conveyors). Look at PMs that, if done poorly, could cause safety incidents, compliance issues, or costly downtime.
For example, a monthly lubrication route for your plant’s motors or quarterly inspections of a pressure relief valve are both worth documenting.
Ideally, you will end up with a digital checklist that is saved in your maintenance software and can be attached to PMs for easy reference.
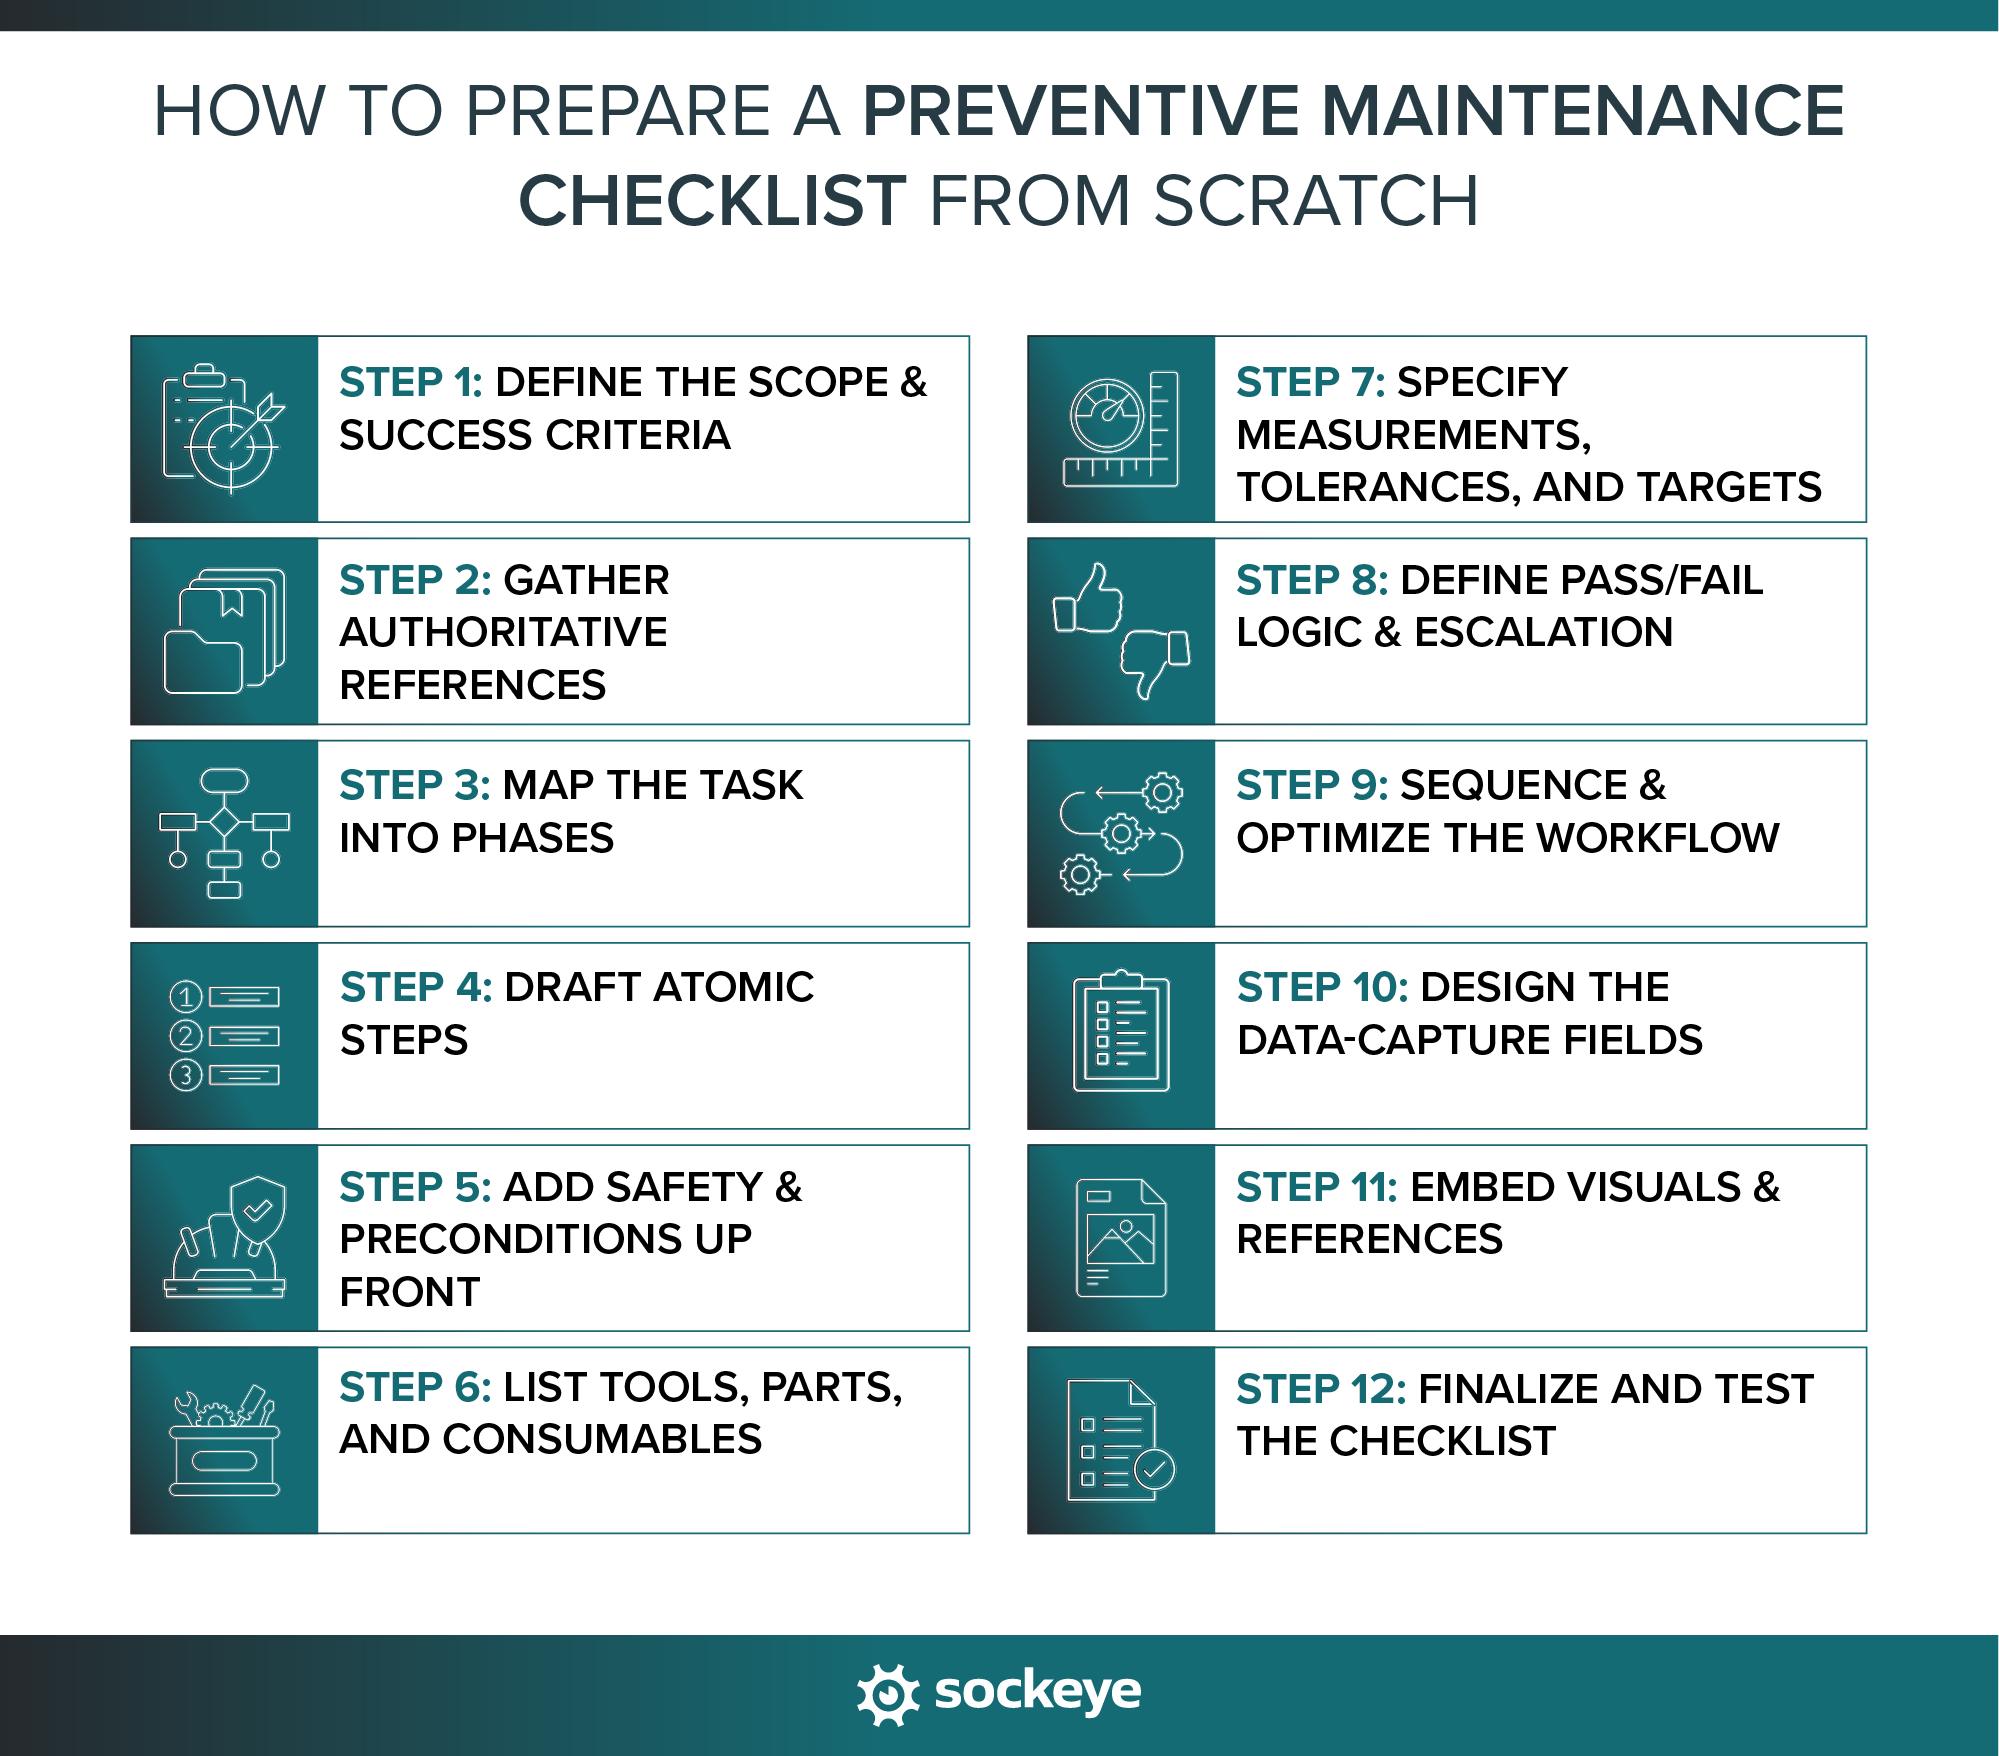
Step 1: Define the scope & success criteria
Start by stating exactly what the PM task is meant to achieve in one clear sentence. This helps everyone understand the goal and keeps the checklist focused.
For example: “Maintain pump reliability and seal integrity between overhauls.”
Next, define what “done” looks like. These are the measurable conditions you can use to confirm the PM task was completed successfully. Examples might include:
- Asset running within X–Y operating specs.
- No leaks or abnormal noise present.
- Guards and covers reinstalled correctly.
- Properly closed out PM that includes all of the pass/fail checks.
Step 2: Gather authoritative references
Before drafting steps, collect all the information you’ll need. You might need to look at:
- OEM manuals: Relevant sections with maintenance intervals, specs, or torque values.
- Internal SOPs: Existing maintenance procedures and best practices.
- Past work orders: Notes on common failure points or issues that show up repeatedly.
- Technical references: Torque charts, MSDS sheets, wiring diagrams, etc.
- Regulatory requirements: Any safety, environmental, or compliance guidelines that are relevant to the task at hand.
Capture page numbers, section IDs, or figure references for later citation in the checklist. That way, technicians don’t have to hunt for additional info mid-task — it’s already documented.
Step 3: Map the task into phases
When thinking about how to structure longer tasks, it is helpful to break them down into logical chunks. A typical flow looks like this:
- Prepare: Gather tools, review safety notes, and verify work order details.
- Isolate/Make Safe: Lockout/tagout procedures, de-energize systems, relieve pressure, etc.
- Service/Inspect: Perform the core PM steps — clean, inspect, replace, or test components.
- Adjust/Lubricate: Make adjustments or apply lubricants per OEM specs.
- Test/Verify: Bring the asset back online and confirm it meets performance criteria.
- Restore/Housekeeping/Closeout: Reinstall guards, clean the area, and complete documentation.
These phases become headers in your checklist. They keep work organized and ensure nothing critical is overlooked.
Step 4: Draft atomic steps (one action per line)
Each checklist line should describe a single, clear action. Where appropriate, provide context and measurable criteria.
Avoid vague steps like:
❌ Inspect belts for cracks.
❌ Check if oil levels are good.
❌ Be sure to tighten bolts.
Instead, make it precise and measurable:
✅ Inspect drive belt for cracks under 300–500 lux lighting. Replace if more than 3 cracks per 100 mm.
✅ Measure gearbox oil level. Top up with ISO VG 150 oil if the level is below the halfway mark.
✅ Torque motor mounting bolts to 65 Nm using a torque wrench and verify all bolts are secure with no visible gap under washers.
Step 5: Add safety & preconditions up front
Every PM checklist should begin with any safety requirements and environmental conditions that must be met before work starts. This makes sure technicians don’t overlook critical safety steps and that the job is done under the right conditions.
Examples of what to include:
- Lockout/Tagout: e.g., “Identify isolation points and confirm zero energy before touching equipment.”
- Permits: If applicable, list hot work, confined space, work-at-height, and other permits needed.
- PPE requirements: Safety glasses, gloves, hearing protection, flame-resistant clothing, etc.
- Environmental conditions: Cooldown time after shutdown, ambient temperature, or wind speed limits.
- Stop-work rules: e.g., “If you detect unusual odor or see leaks before starting, stop and notify supervisor.”
Placing these items at the very start of the checklist ensures technicians see and follow them before they do anything else.
Step 6: List tools, parts, and consumables
Before a technician even starts, they should know exactly what tools and materials they’ll need. This avoids wasted trips back to the shop and prevents delays mid-job. Include details that make it easy to grab the right items the first time.
Examples of what to list:
- Tools: Wrench sizes, torque wrench (with required range), calibrated instruments, specialty tools (“17 mm socket, calibrated torque wrench (20–100 Nm), ISO vibration meter.”).
- Parts and consumables: Replacement gaskets, belts, seals, filters, etc. Include part numbers and quantities (“1 × 3VX500 belt (PN 12345), 2 × bearing seals (PN 67890)”).
- Lubricants and fluids: Include grade, viscosity, and amount (“Lithium EP2 grease, 50 g per bearing; ISO VG 68 oil, 1 L.”).
- Approved alternates or kit numbers: If there’s a pre-assembled kit or acceptable substitute, note it.
Step 7: Specify measurements, tolerances, and targets
For every check that produces a measurable value, define exactly what should be measured, how to measure it, and what’s acceptable. Include:
- What to measure: Identify the component and measurement point.
- Instrument/tool: Specify the approved device (calibrated if required).
- Units: Always list the unit of measurement to avoid ambiguity.
- Target and tolerance: State the acceptable range and what’s out of spec.
Examples:
- “Measure vibration RMS at drive-end vertical using ISO 10816 vibration meter; target ≤ 3.5 mm/s.”
- “Check bearing temperature with infrared thermometer; acceptable range 45–70 °C, escalate if > 70 °C.”
- “Record pump discharge pressure using calibrated gauge; must be between 6.8–7.5 bar.”
By defining clear numbers and limits, technicians know when the asset is within safe operating conditions and when to trigger corrective action.
Step 8: Define pass/fail logic & escalation
When measurements are involved, you will want to define what should happen if something is out of spec. How detailed you want to be will depend on your internal needs and asset priority.
As a rule of thumb, for each measurement or check, consider defining:
- What counts as pass/fail or acceptable/not acceptable
- What action to take if it fails
- How urgent the follow-up is and who to notify
- Safe-to-run guidance if applicable.
Examples:
- “If vibration RMS > 3.5 mm/s, mark Fail; create corrective WO as Priority 2 and notify supervisor before restarting.”
- “If the oil level is below the halfway mark, top up with ISO VG 150. If leaks are present, mark Fail and submit a work request for seal replacement.”
- “If the emergency stop button does not halt the machine within 1 second, tag the equipment out of service immediately and escalate as Priority 1.”
Make this logic explicit in the checklist. Many digital PM forms allow branching (checkboxes, radio buttons) that automatically prompt the next steps when a failure is selected.
Step 9: Sequence & optimize the workflow
Even if all the right steps are on a PM checklist, poor sequencing can waste time and prolong downtime. Organize tasks in the most efficient order while maintaining safety and logical flow.
Key tips:
- Minimize backtracking: Group tasks by physical location and move through the asset in a logical path to avoid repeated motion (like removing and reinstalling a guard multiple times).
- Call out dependencies: Make it clear if one step depends on another being complete first. For example: “Complete Steps 12–14 before energizing equipment for testing.”
Step 10: Design the data-capture fields
A PM checklist can be more than just a guide — it’s often a tool for capturing data you’ll rely on later for analysis, compliance, and continuous improvement. Design each line so it prompts the correct type of data entry and keeps information consistent.
Common types of field to include in a digital PM checklist:
- Checkboxes: For simple pass/fail or yes/no items (“E-stop functional? ✓ Yes / ☐ No”).
- Numeric fields with units: For measurements like vibration, pressure, or temperature (“Record bearing temp (°C): ____”).
- Drop-down options: Standardize common responses such as OK/NOT OK, Clean/Replace.
- Photo upload fields: To capture a problem and/or document work done.
- Open text field: For additional comments, observations, or follow-up recommendations.
Other best practices:
- Standardize units (e.g., always use SI units like °C, mm, bar).
- Define decimal precision (e.g., one decimal place for vibration mm/s).
- Pre-fill defaults where applicable to save time and reduce errors.
Again, most digital tools for creating checklists should allow you to do all of this with ease.
Step 11: Embed visuals & references
Instead of long descriptions, a small photo or diagram can show exactly what the tech should look for or where to perform a check.
You can include:
- Photo thumbnails with arrows: Point out inspection points, correct gasket orientation, or torque sequences.
- Diagrams or tables: Quick reference torque tables, lubrication charts, or wiring diagrams.
- Cross-references: Cite relevant sources like “See OEM manual §5.2, fig. 7 for alignment procedure.”
Visuals reduce mistakes and speed up training for new technicians.
Step 12: Finalize and test the checklist
If you do not want to record these things separately, you can finalize your PM checklist by including:
- Sign-off fields: Technician and verifier signatures (digital or physical), date/time completed.
- Time it took to complete the PM: Help with future job planning.
- Parts used: Quantity and part numbers for inventory tracking.
The only thing left is to test the checklist and make adjustments based on the gathered feedback.
Things that make preventive maintenance checklists counterproductive
Before we wrap this up, let us look at some common mistakes you should avoid while creating preventive maintenance checklists.
Overloading the checklist with unnecessary tasks
One of the fastest ways to kill adoption is by adding unnecessary steps. If a checklist takes half an hour for what should be a 15-minute job, techs will start skipping steps or pencil-whipping boxes just to get it done.
Look for tasks that have never caught an issue, duplicate steps, and “just in case” steps — those can usually be dropped.
Ignoring feedback
A PM checklist should never go straight from someone’s desk into use. This risks leaving ambiguous instructions, missing tools, or unrealistic time estimates.
The best way to validate what’s truly needed is to pilot the checklist on the actual asset. Then, ask for direct feedback from the people using it. Even if one of the technicians created the checklist, that doesn’t mean that others can’t find certain steps confusing, redundant, or impractical.
Failing to update with changing equipment or operational needs
A preventive maintenance checklist can become outdated when your equipment, processes, or compliance requirements change. At that point, it stops adding value and can even cause mistakes.
To make sure that doesn’t happen, review relevant PM checklists whenever:
- You replace or upgrade equipment that now operates differently than before.
- Implement process changes that add or remove steps in how the asset is used.
- Update OEM recommendations or safety regulations.
- There is an asset that continues to experience recurring failures, or an audit points to a gap in your PM.
To avoid falling behind, we recommend scheduling periodic reviews of all PM checklists — at least annually and after major changes.
Not making PM checklists easily accessible
Don’t keep your PM checklist in dusty binders or email attachments. They’ll either be skipped altogether or filled out later from memory — neither is good.
Instead, store checklists digitally in your CMMS or a mobile-friendly tool, so they’re easily accessible in the field. If possible, link to or attach PM checklists to your PMs so the tech doesn’t have to search for them in a large database.
Be it a CMMS or a no-code checklist builder, you will want a tool that has offline functionality — so that techs can access and submit everything even without an internet connection.
Before the checklist: Why scheduling comes first
You know what sucks? Spending time to create awesome checklists that never get used because PMs are constantly delayed, and reactive work keeps piling up.
Do not put the cart before the horse. First, make sure your team can consistently publish realistic PM schedules — and respect the deadlines.
If you struggle with doing that, simplify your maintenance scheduling and reporting process by connecting Sockeye to your existing CMMS/EAM. Sockeye is a scheduling bolt-on that:
- Helps teams build consistent, manageable PM schedules.
- Offers a two-way integration with your existing CMMS/EAM systems to simplify maintenance scheduling, tracking, and reporting.
- Has a real-time labor availability dashboard, which helps teams balance workloads between teams and schedule work up to 100% capacity. This frees up room to do more routine maintenance → more chances to put those PM checklists to work.
- Helps you diligently track reasons whenever a PM is delayed.
- Tracking PM compliance and other KPIs to make sure preventive tasks are not only done, but done efficiently and on time.
Before you start building or overhauling checklists, audit your current PM schedule. When it looks good, pair it with strong checklists — and you’ll see productivity and reliability take off.