SAP PM (Plant Maintenance) is a module within SAP that helps organizations plan, execute, and track maintenance activities.
In theory, SAP PM gives you everything you need: structured processes, detailed tracking, and full visibility into maintenance work. In practice, many teams struggle with it. The interface can feel complex, the process rigid, and simple tasks — like creating or rescheduling a work order — often take more time than they should.
If you’ve ever found yourself clicking through multiple tabs, wondering if you’re doing it “the right way,” you’re not alone.
In this article, we’ll break it all down in a practical, no-nonsense way. You’ll learn:
- The key concepts you need to understand before creating orders.
- A step-by-step guide to creating a work order in SAP PM using IW31.
- How teams are solving common scheduling challenges with SAP PM.
Let’s start with the basics.
How does SAP PM manage work orders?
Similar to your run-of-the-mill CMMS, SAP PM manages work orders through a structured process that takes a job from request to completion.
Here’s the simple way to think about it:
- Something needs to be fixed or maintained: This usually starts with a notification (e.g., “Pump is leaking”).
- A work order is created, planned, and scheduled: The planner turns that request into a work order by adding/estimating labor, materials, time, and instructions.
- The order is released: Once everything is ready, the order is released so technicians can start working.
- Work is executed and confirmed: Technicians perform the job and confirm their time, activities, and sometimes materials used.
- The order is completed and closed: After the work is done, the order is technically completed (TECO) and eventually closed (CLSD), locking it for further changes.
Compared with lightweight CMMS tools, the key difference is that SAP tightly enforces each stage and links it closely to costing and accountability. This means:
- You can’t confirm work before releasing an order.
- You can’t skip planning steps without consequences.
- Every action is tied to a status and a business rule.
This structure ensures compliance, but it’s also where many users get frustrated. If you don’t understand the flow or want to make specific changes, SAP can feel like it’s blocking you at every step.
Key concepts you need to understand first
Before trying to create work orders, it’s important to understand the building blocks of how SAP PM organizes maintenance work.
If you skip this part, SAP will feel confusing very quickly — because a lot of fields and decisions only make sense when you understand what’s happening behind the scenes.
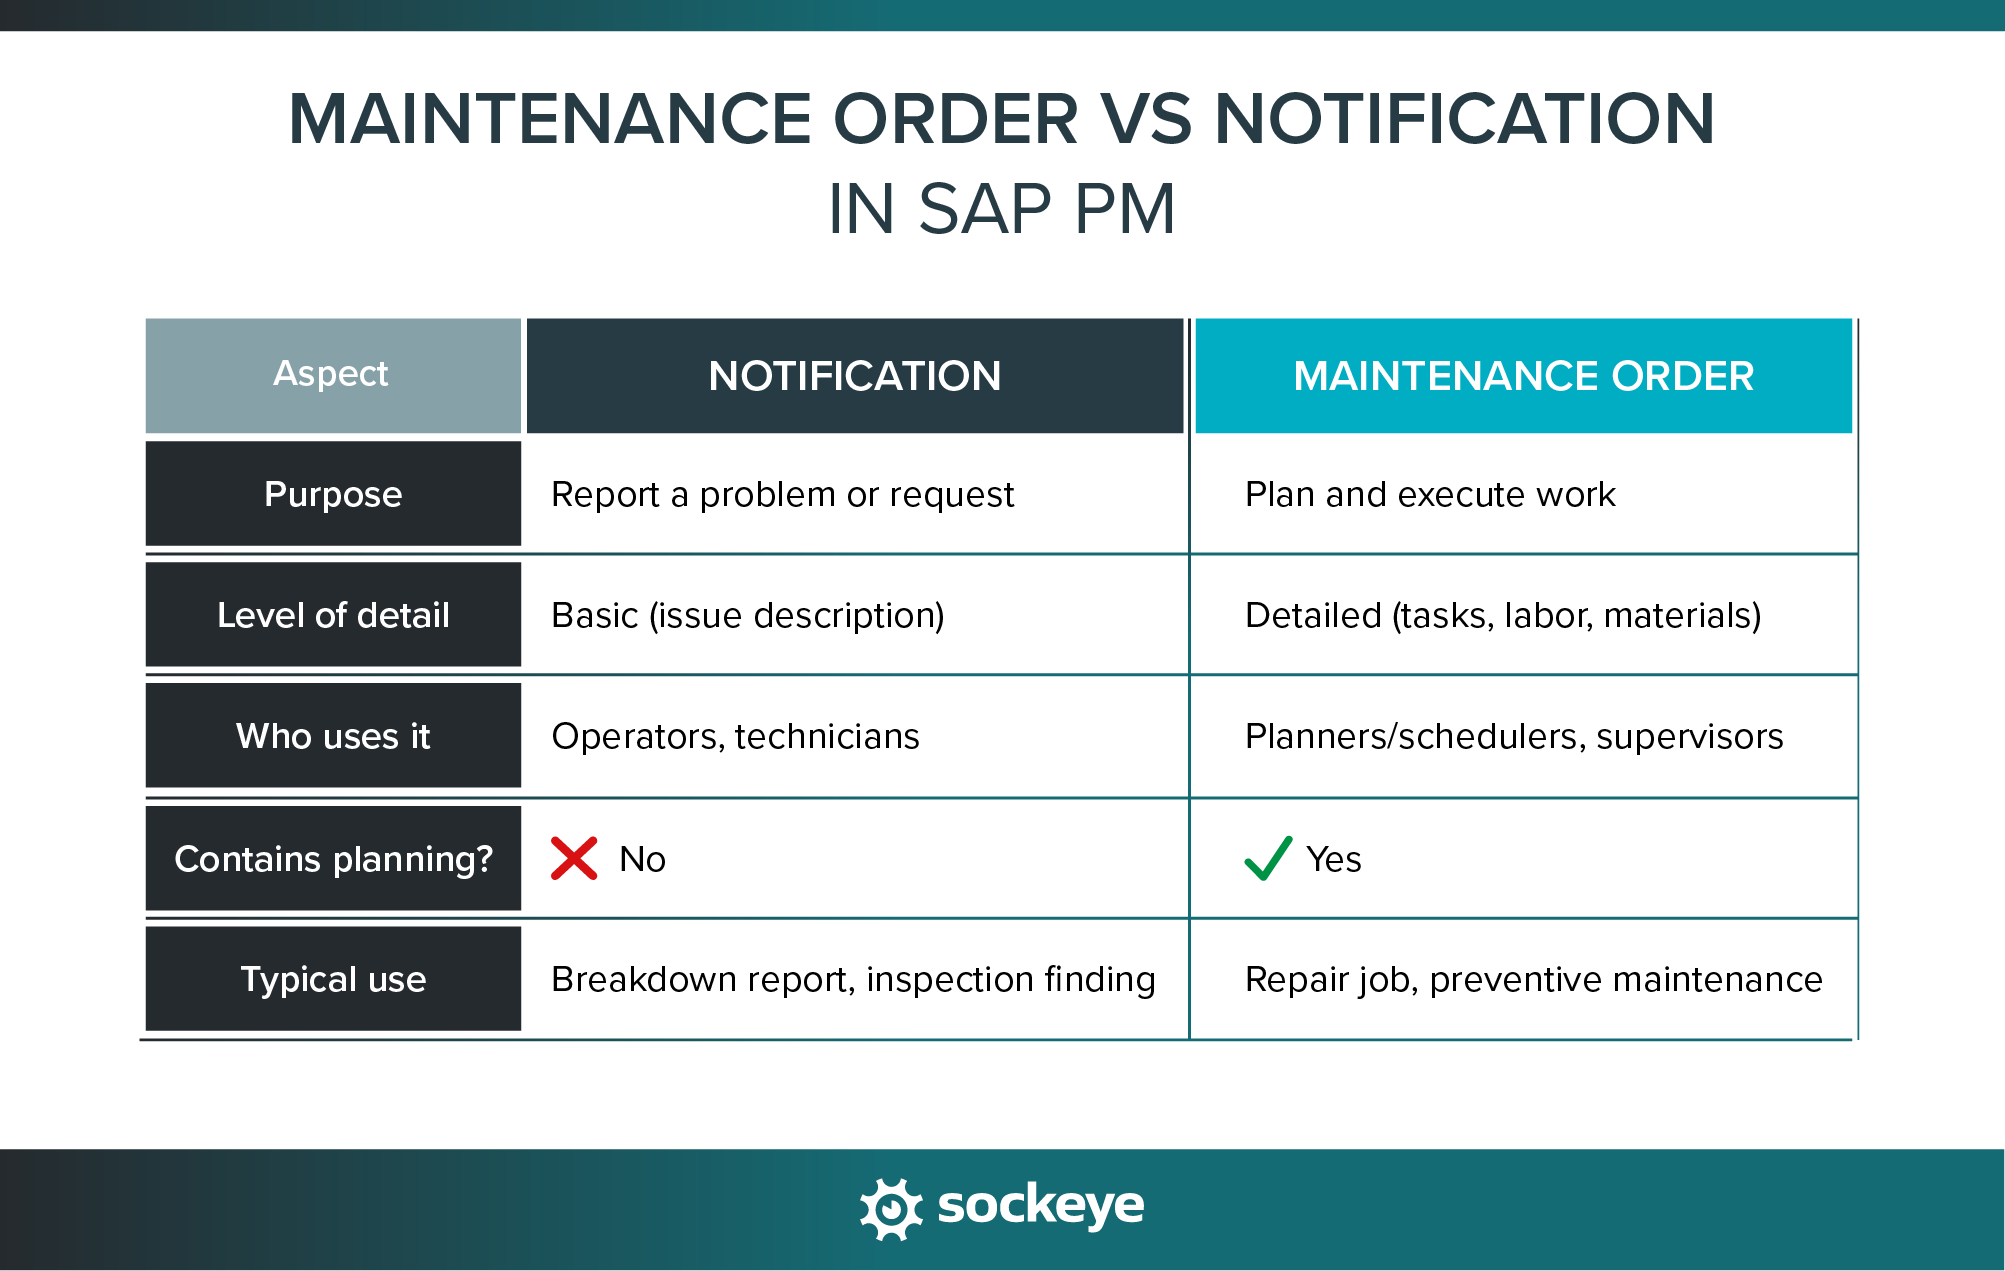
Maintenance Order vs Notification
This is one of the first things that trips people up. So let’s clear things up:
- Notification is simply a way to report a problem or request maintenance work. It usually contains a short description of the issue and the affected equipment. It may or may not be converted into a work order.
- Maintenance Order is where the actual work gets planned and executed. It defines what needs to be done, who will do it, how long it should take, what materials are required, and when the work should happen.
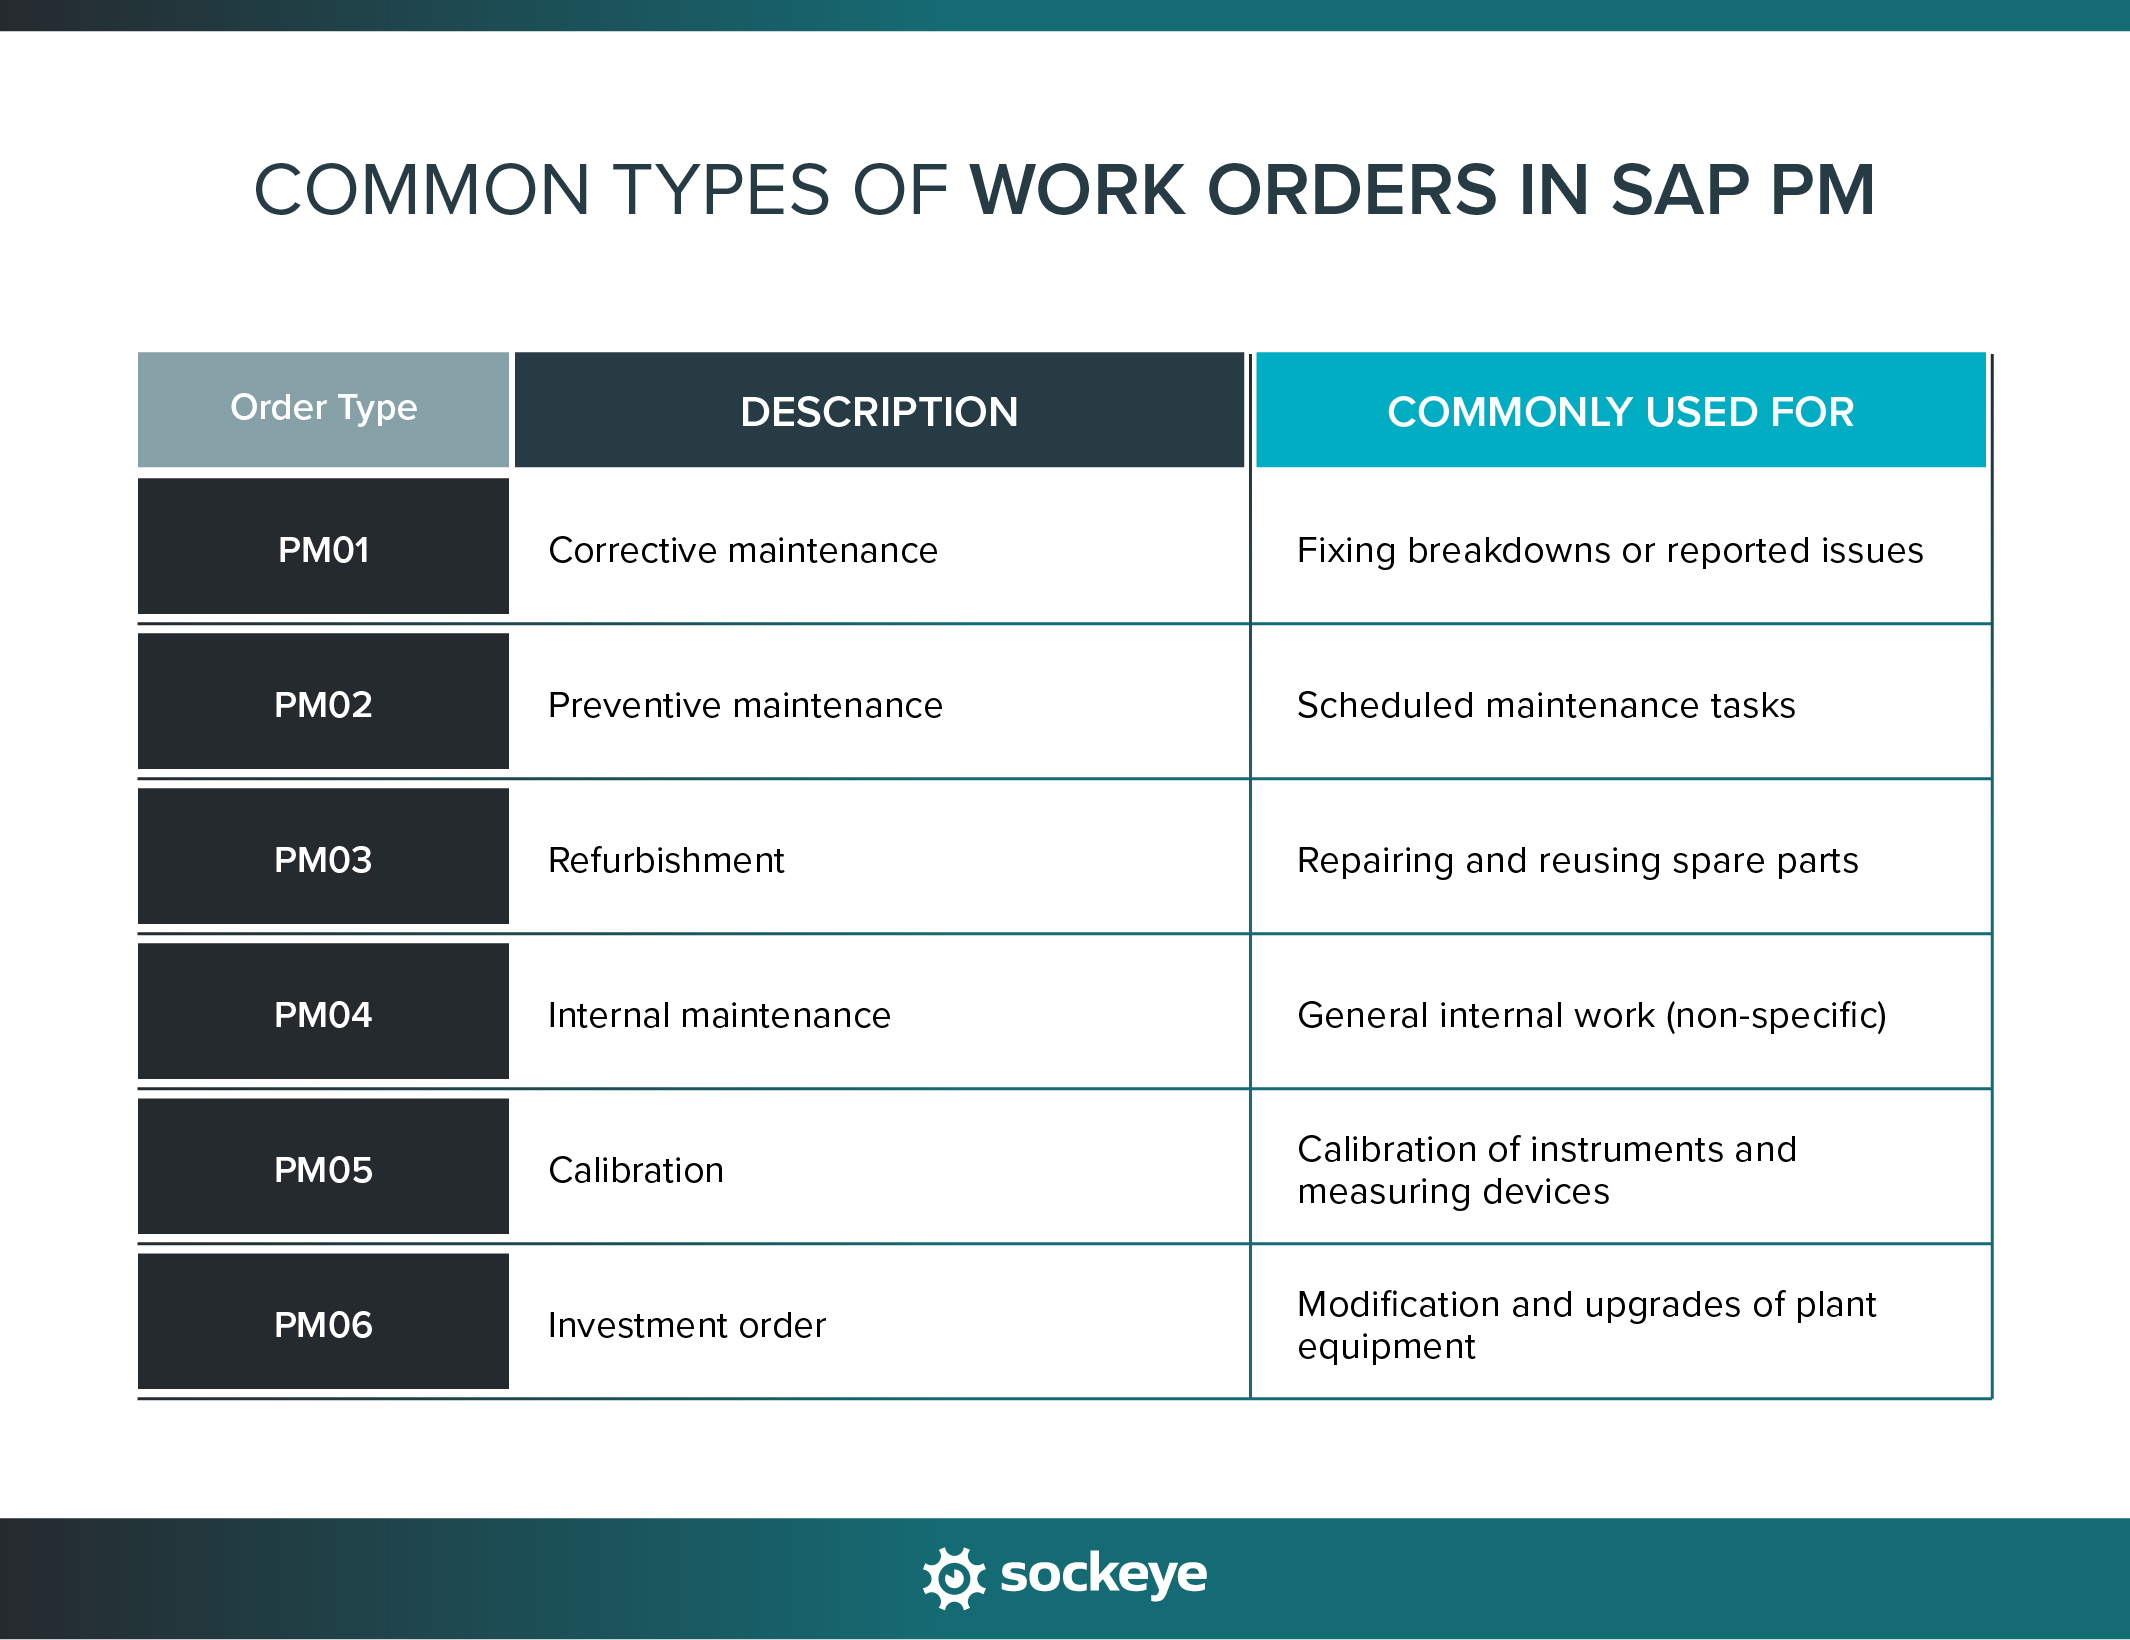
Work order types in SAP PM
Work order types in SAP PM define how a job is handled in the system. They control things like planning rules, costing, scheduling behavior, and which fields are required.
Every organization can configure order types based on its business requirements. It’s a great way to segregate maintenance jobs into groups for easier tracking and analysis.
At a minimum, plants need two types: PM01 and PM02 for corrective and preventive maintenance, respectively. While names can vary slightly between companies, most SAP systems include a few standard types you can see in the image below:
Functional location vs Equipment
On the surface, this seems self-explanatory: a location says where the asset is, while an equipment says what the asset is. But there is some nuance.
When creating a work order (IW31), you must assign it to a reference object — either a functional location or a piece of equipment. This determines:
- Where the work is recorded
- How history is tracked
- What technical data is available.
In general, it’s best to use equipment when you want detailed tracking of a specific asset, and reserve functional location for work that applies to an area or system.
Work Centers, Planners, and Control Keys
These three elements define who does the work, who plans it, and how SAP handles it.
Let’s clarify:
- Work Center → Tells SAP which team or resource will be doing the job (e.g., Mechanical, Electrical, Contractor crew).
- Planner Group → The person or team responsible for planning (e.g., Maintenance planner for Area A).
- Control Key → Defines how the operation behaves in SAP (e.g., does it require confirmation, scheduling, costing?).
If these are set incorrectly, all kinds of problems can pop up: work may not show up for the right team, time confirmations might be blocked, scheduling and costing may not work properly, and so on.
SAP PM work order status codes
Every work order in SAP follows a defined lifecycle. This is tracked through status codes that show where the job is, from creation to final closure.
Here’s a table that shows what each status means:
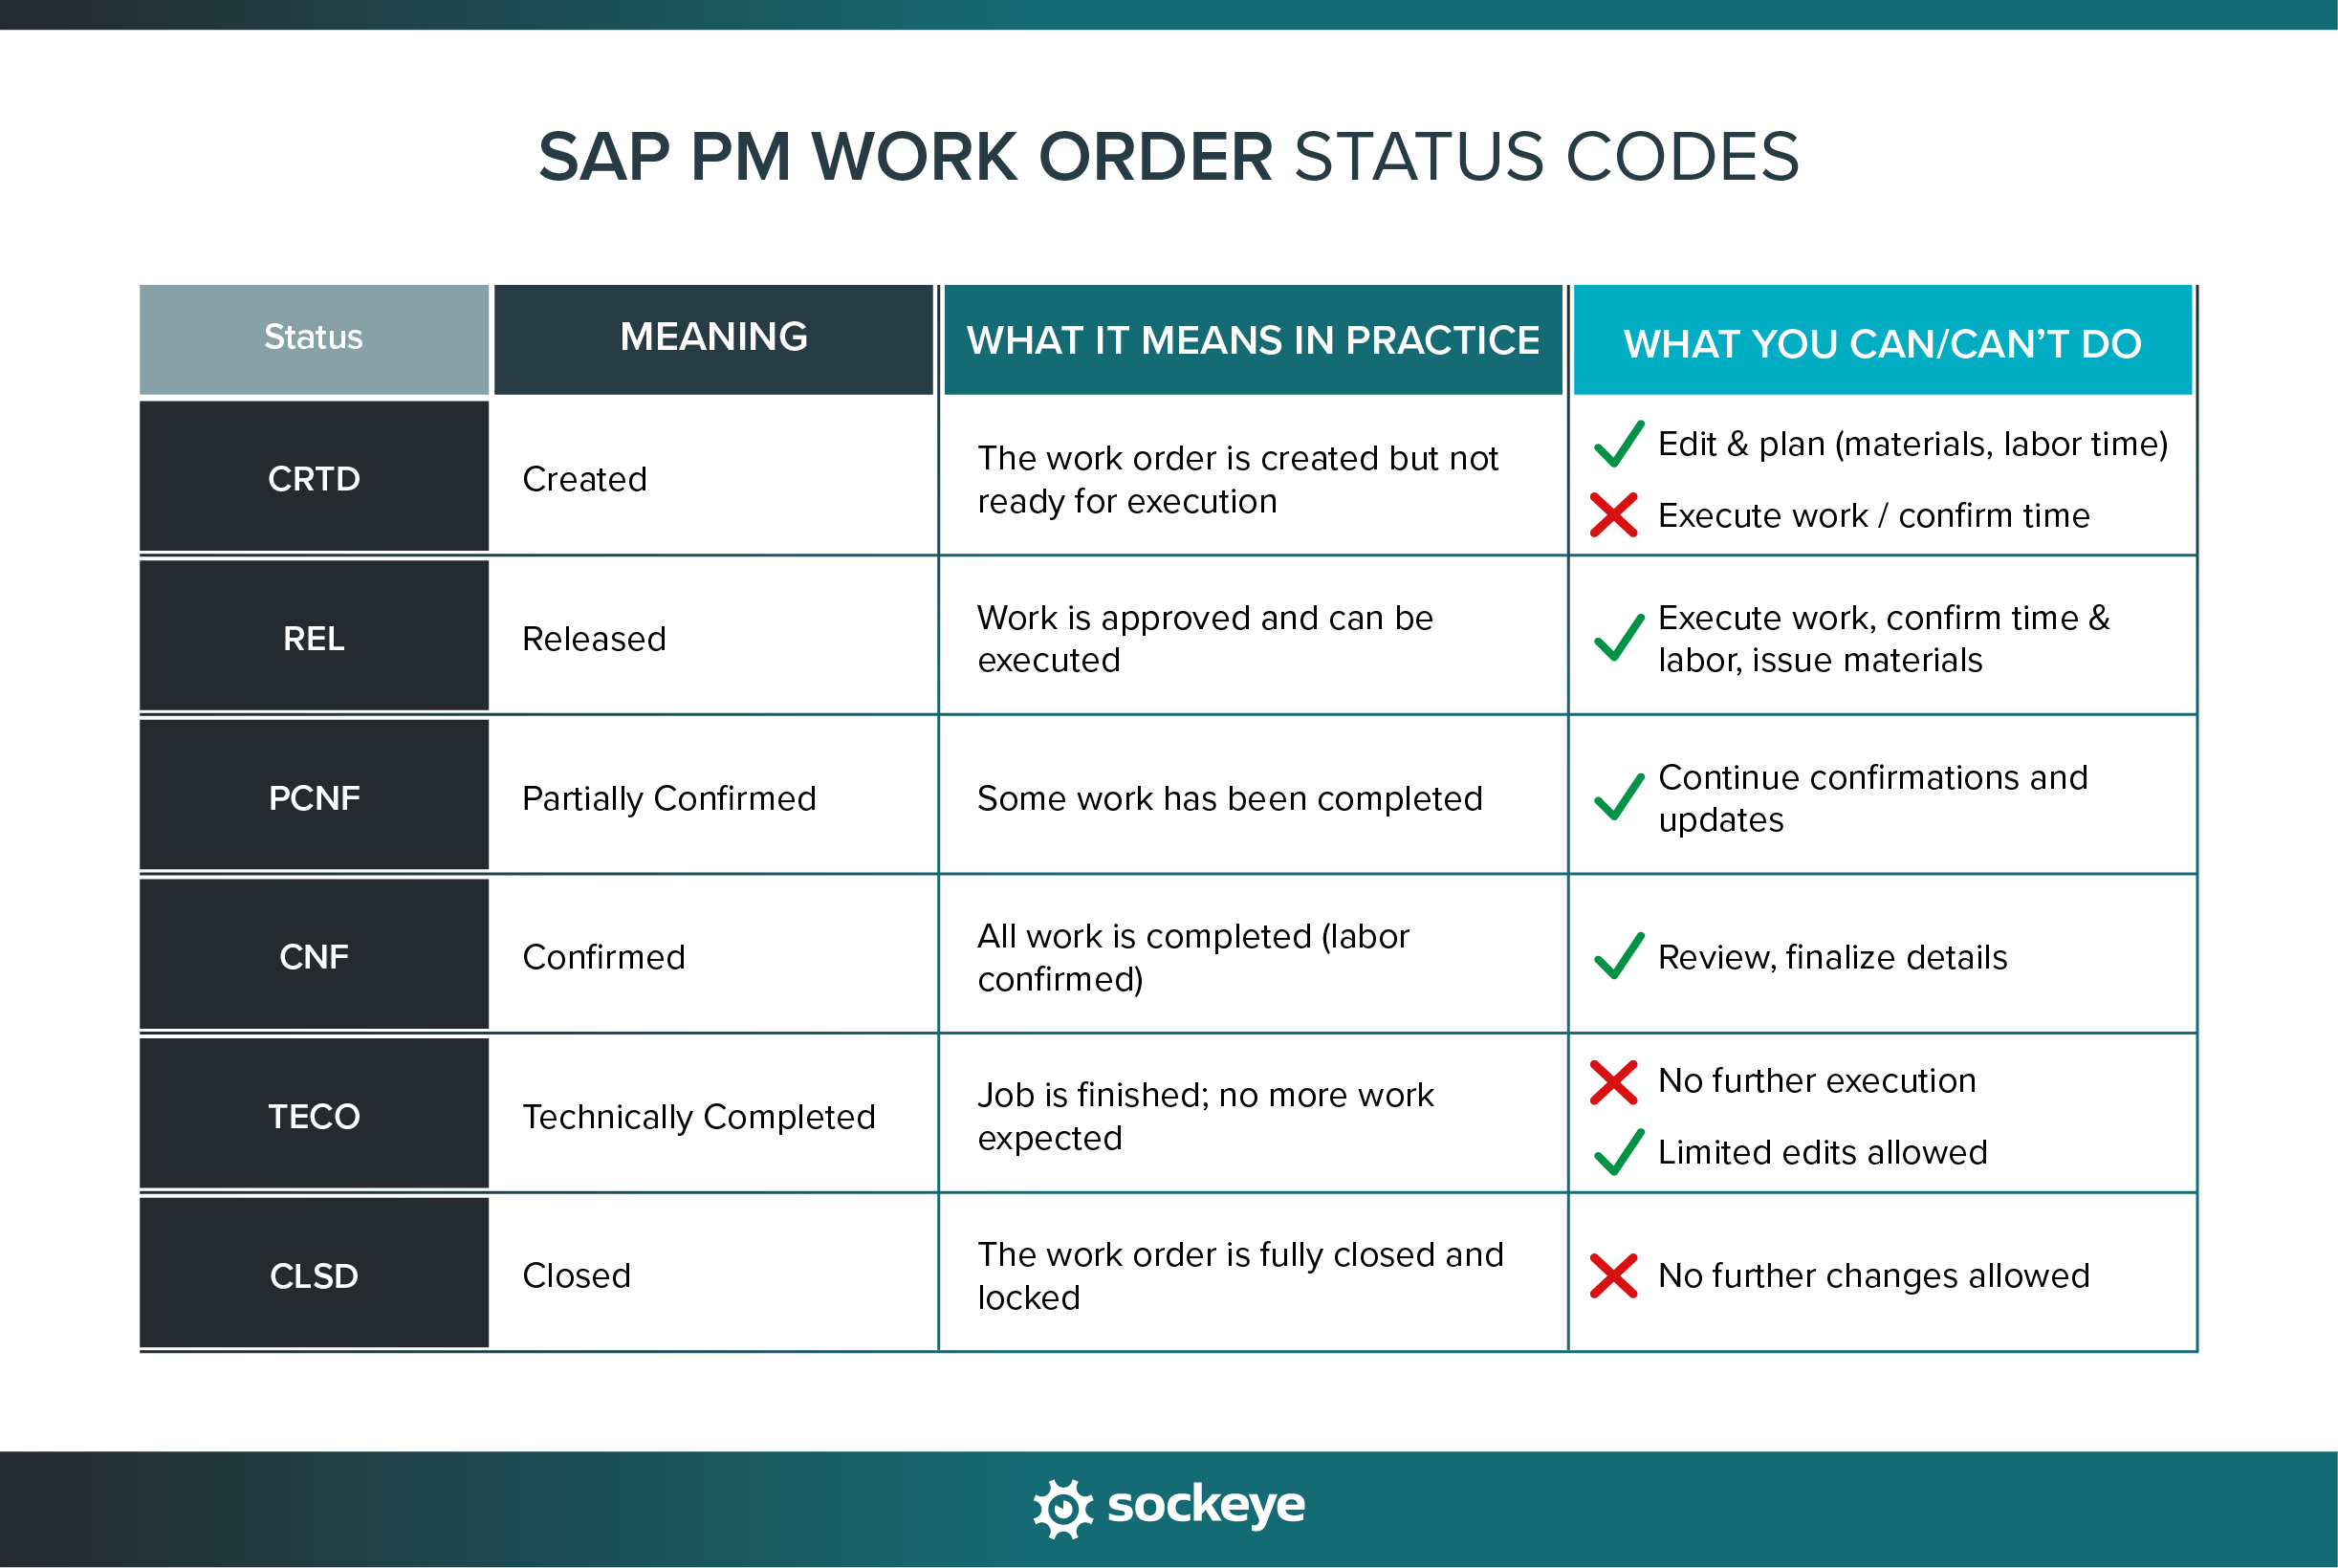
As you can see, these statuses don’t just describe progress — they actively control what actions SAP allows at each stage.
SAP navigation basics
Before creating or managing work orders, it helps to understand a few basics about how you move around in SAP.
Most users work in SAP GUI, where actions are performed using transaction codes (T-codes). Instead of clicking through menus, you can jump directly to a function by typing a code into the command bar.
Below is a quick breakdown of common T-codes for work orders.
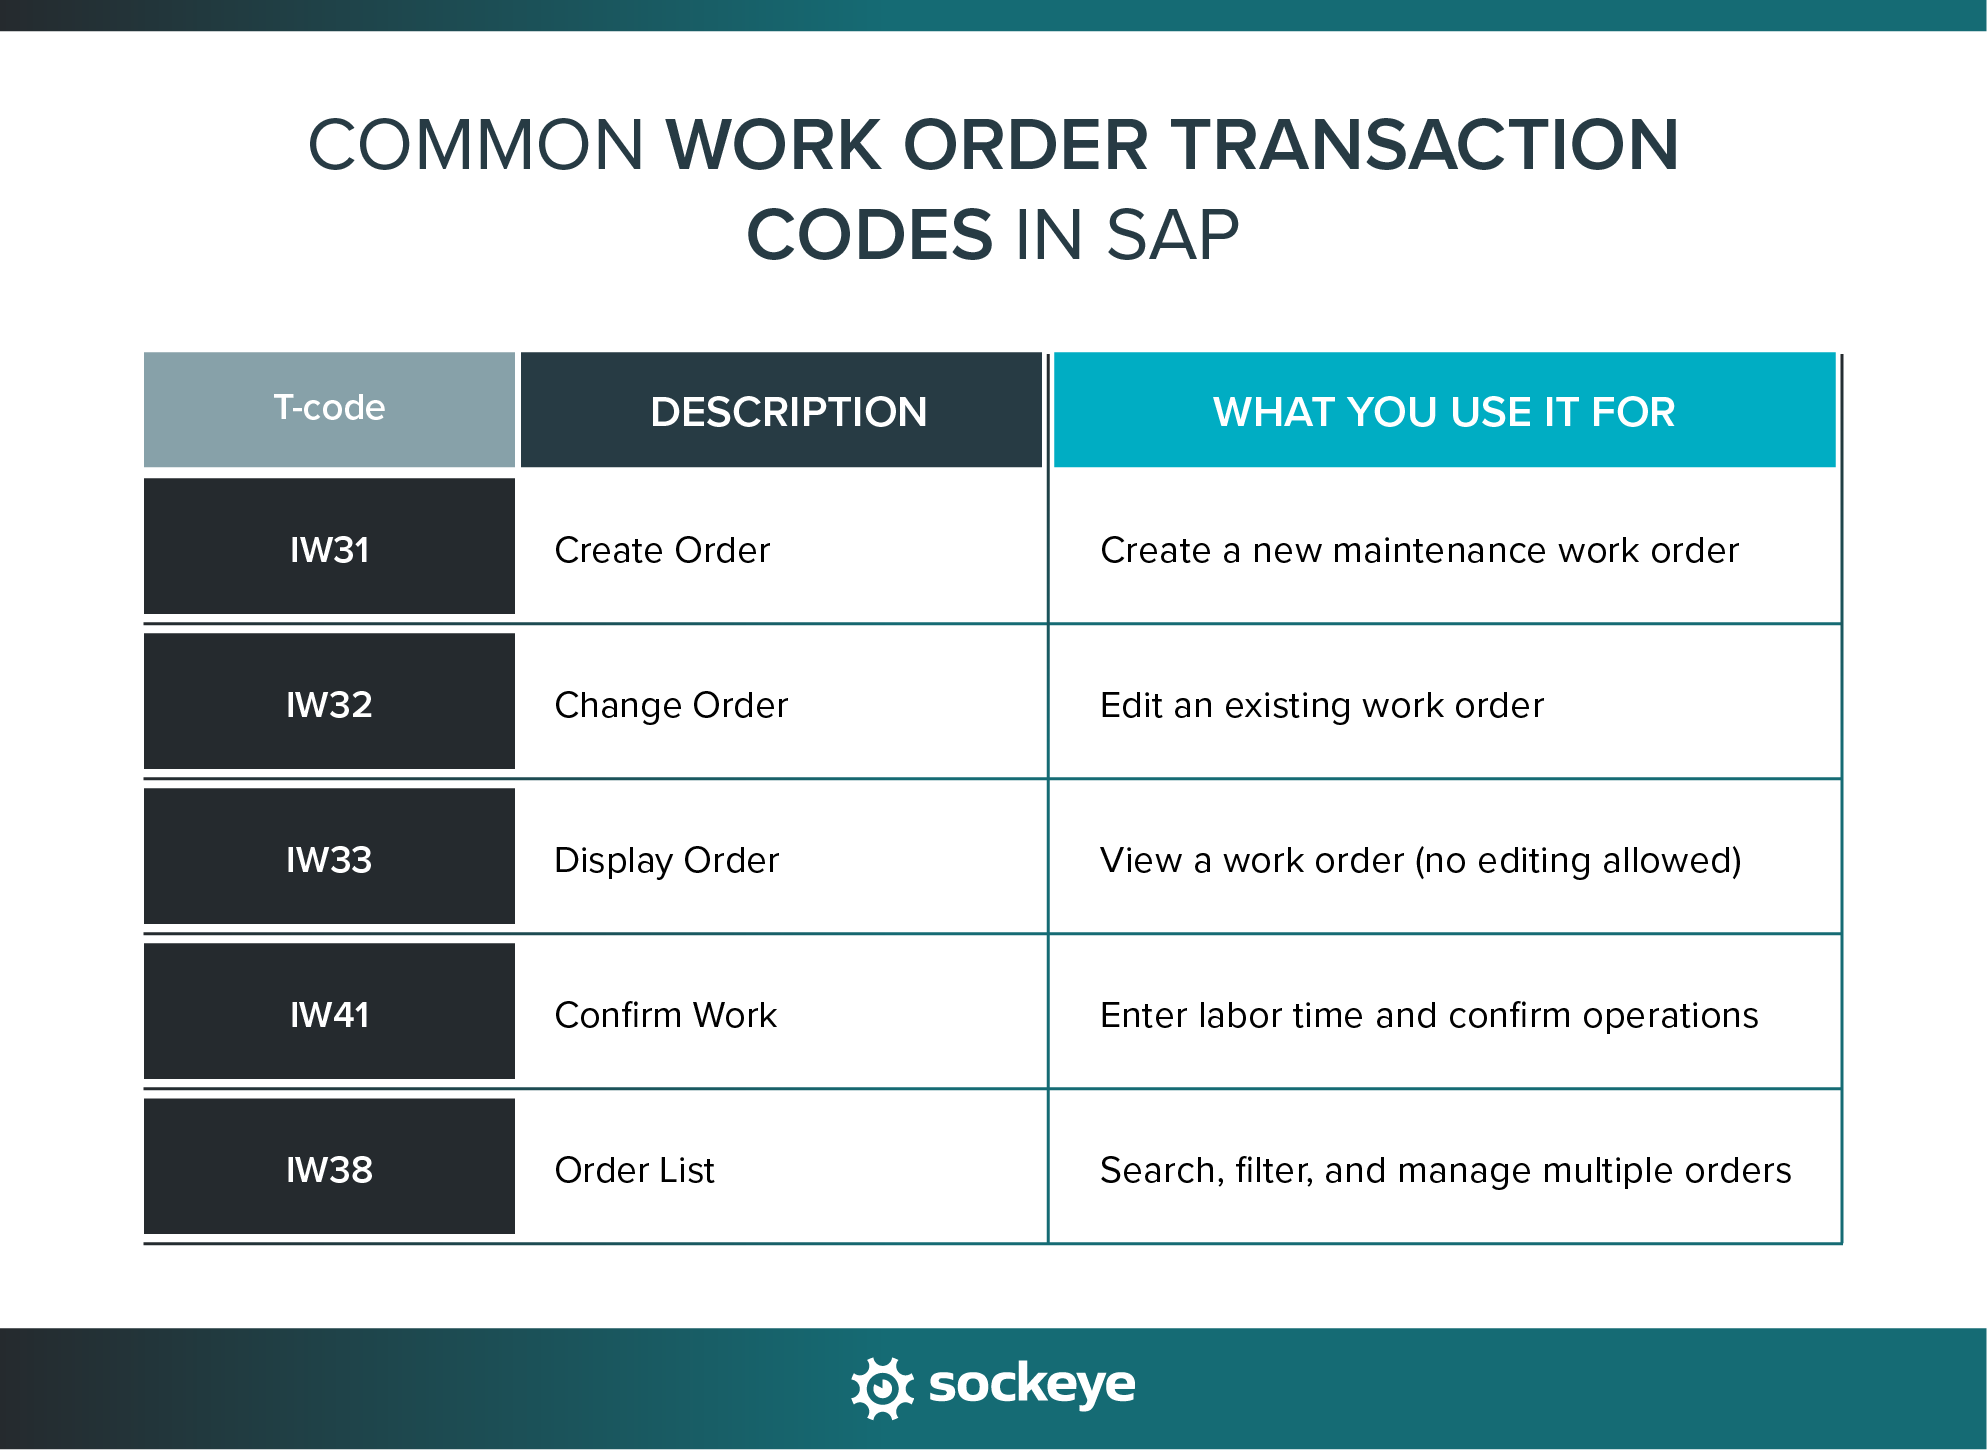
If you remember just a few T-codes, you can navigate SAP much faster and reduce at least some of the unnecessary clicking.
How to create a work order in SAP PM step-by-step
Now that you understand the key concepts, let’s walk through how to actually create a work order in SAP PM.We’ll use the most common transaction: IW31 (Create Order). The process becomes easier once you know what each field is asking for.
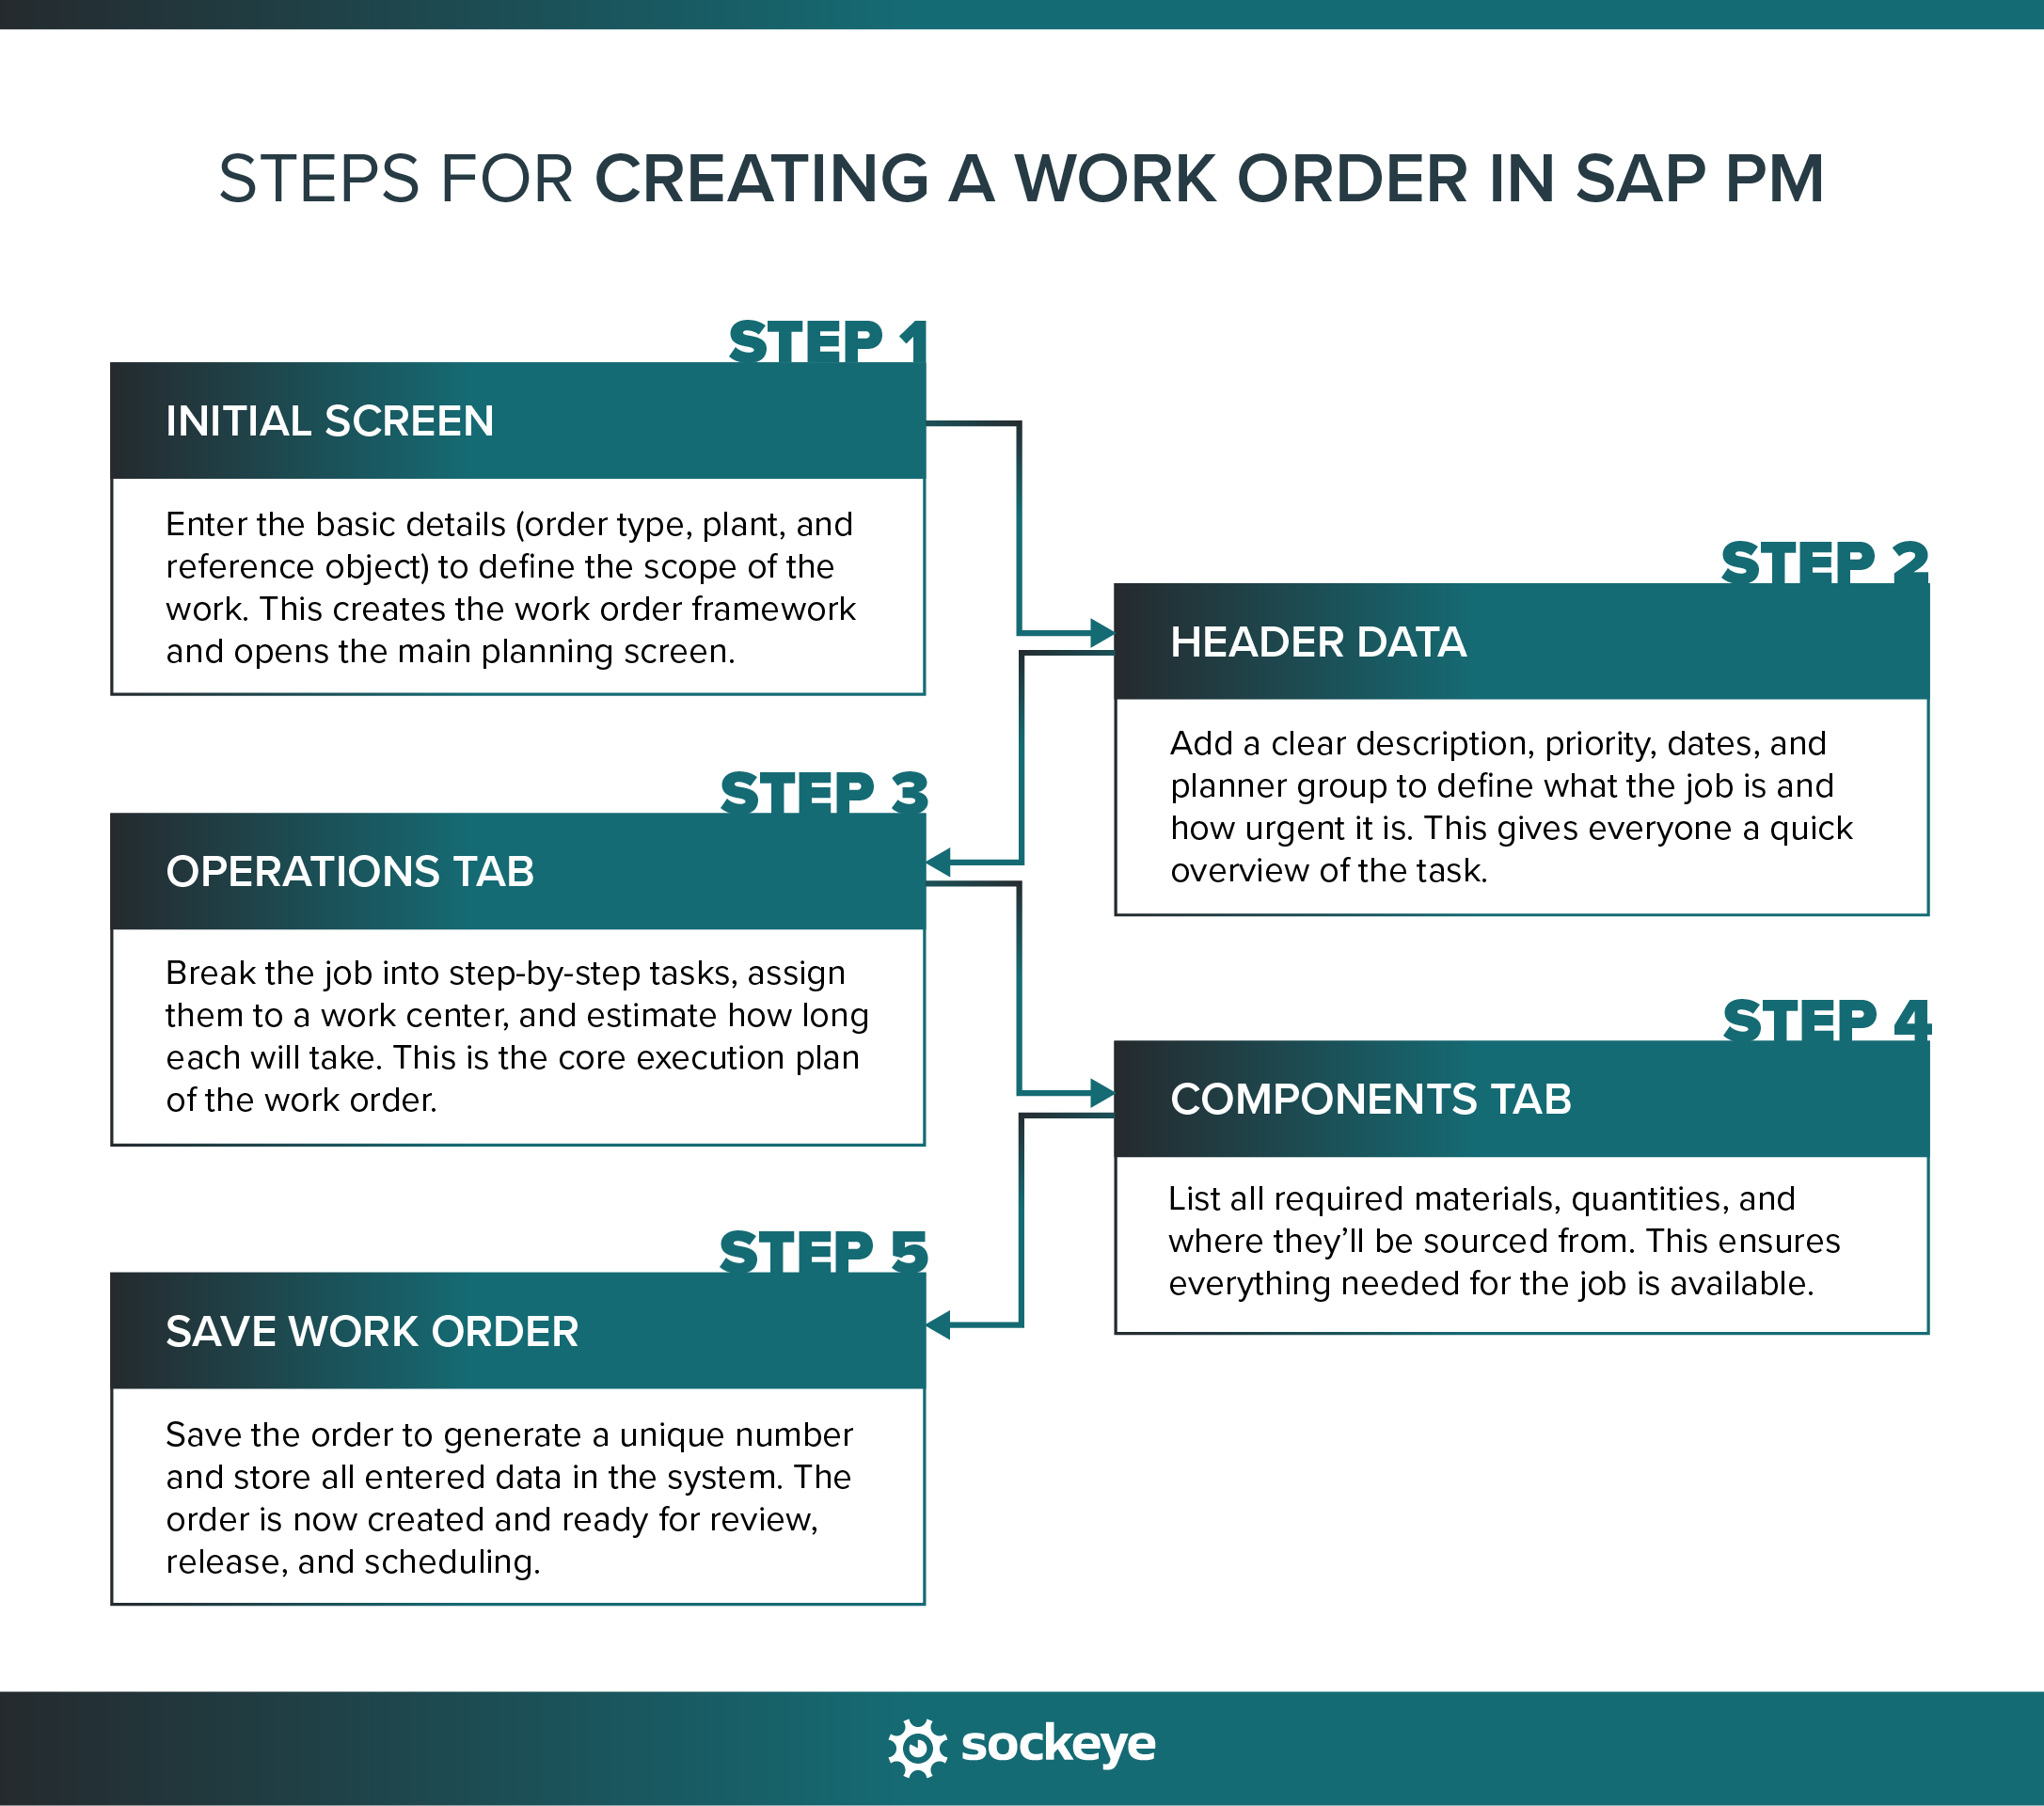
Step 1: Initial screen
When you open IW31, the first screen asks for a few key inputs that define the foundation of your work order. You’ll need to enter:
- Order type: Defines what kind of work you’re creating (e.g., PM01 for corrective work).
- Planning plant: The plant responsible for planning and executing the work (e.g., 1000).
- Reference object: The asset (equipment/ functional location) you’re working on (Pump P-101, for example).
Once you enter this and proceed, SAP creates the work order shell and takes you to the main screen, where detailed planning begins.
Step 2: Header data
The header data is supposed to give a clear overview of the job. You’ll need to enter:
- Description: A short, clear explanation of the work.
- Priority: Indicates how urgent the work order is (e.g., High, Medium, Low)
- Basic start/finish dates: When the work is planned to begin and end.
- Planner group: The team or person responsible for planning the job.
Here’s a quick example:
- Description → “Replace mechanical seal on Pump P-101”
- Priority → High
- Start date → Today
- Finish date → Today + 1 day
- Planner group → MECH
Keep the description simple and specific — this is what technicians will see first.
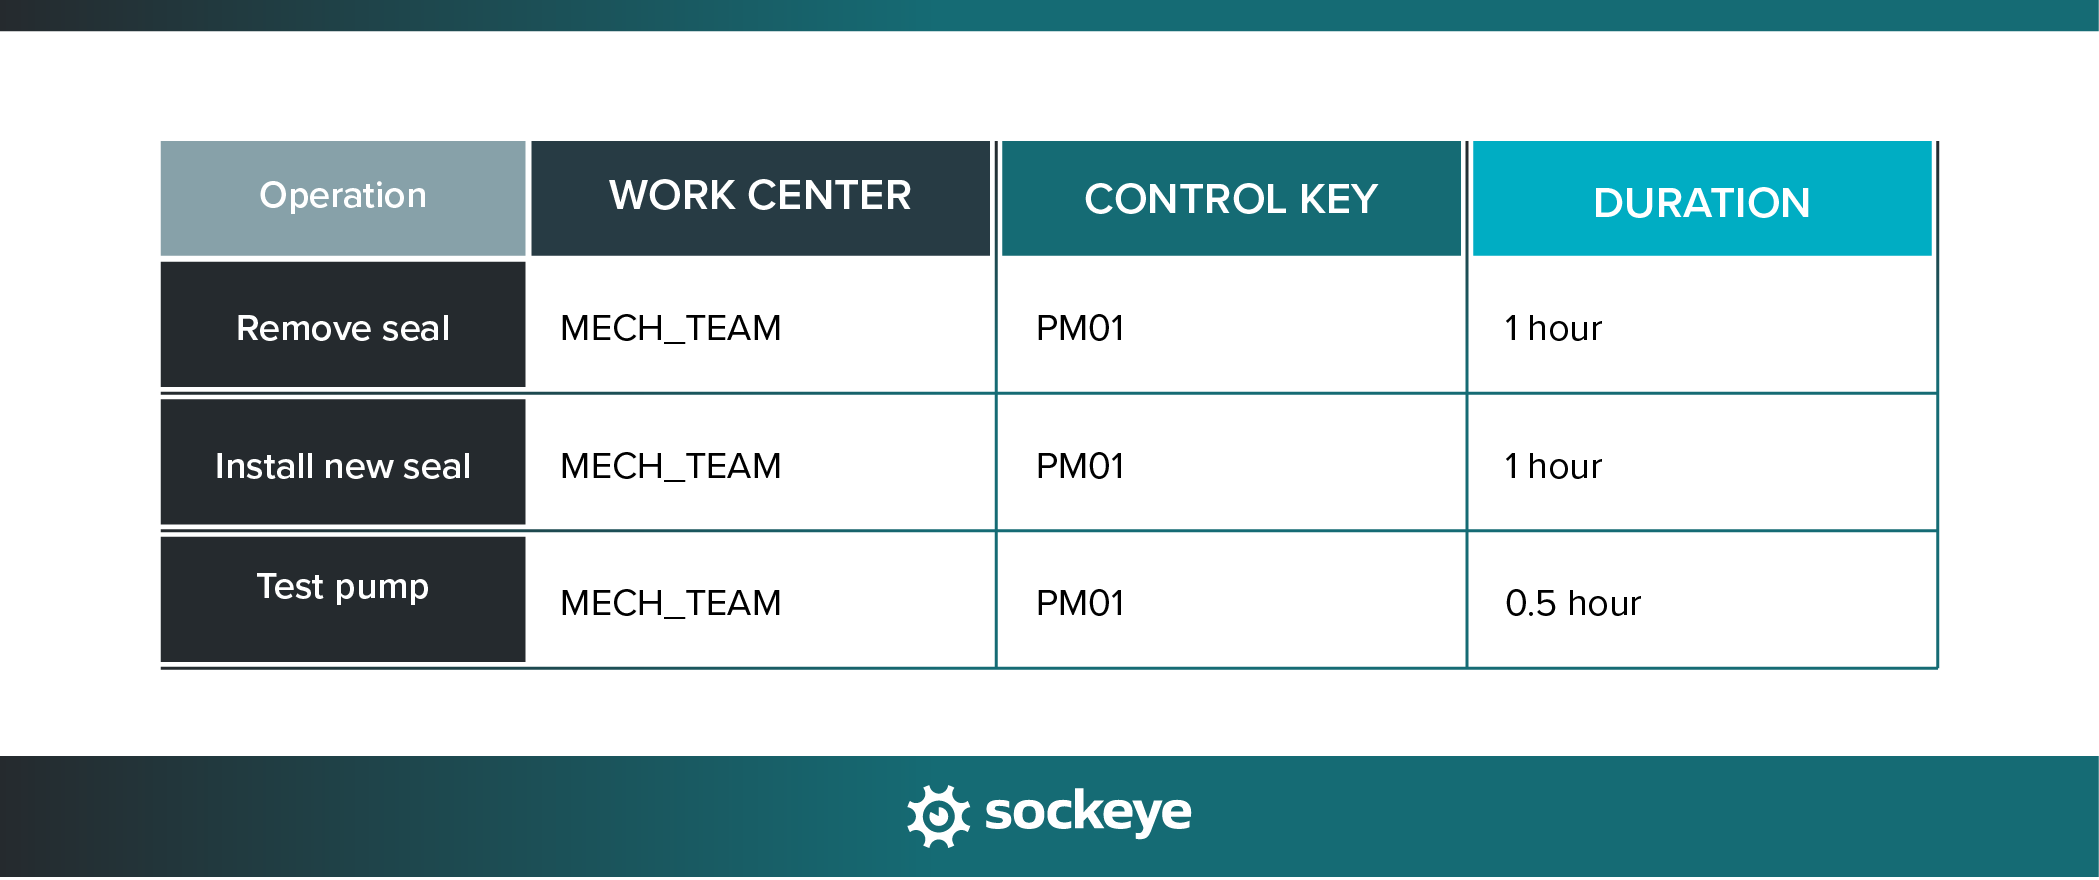
Step 3: Operations tab
This is where you define the actual work that needs to be done. Think of operations as the step-by-step tasks within the job.
You’ll be asked to enter:
- Operations: Short descriptions of each task, preferably in sequential order (e.g., remove → replace → test).
- Work center: The team responsible for performing the work.
- Control key: Defines how the operation behaves (e.g., requires confirmation).
- Estimated duration: How long the task should take.
Quick example for the pump repair:
Step 4: Components tab
This is where you add the materials or spare parts required to complete the job. You’ll have to provide the following info:
- Material: The spare part or item from your SAP material master (for pump repair, you might need a Mechanical seal kit and a Gasket set).
- Quantity: How many units are needed.
- Storage location: Where the material will be issued from (e.g., MAIN_STORE).
Step 5: Saving the SAP PM work order
Once all the required information is entered, you can save the work order.
Here’s what happens when you click save:
- SAP generates a work order number. This is a unique identifier used to track the job.
- The order is created with status CRTD. It exists in the system but is still in the planning stage.
- All entered data is stored. Operations, materials, dates, and assignments are now part of the order.
After saving, the person with the right access can review and adjust details (IW32), release the order (enables material movement and signals the job is approved), and schedule the work (confirm/update planned dates, align work with crew availability and shift schedules).
Useful resources for SAP PM planning and scheduling
If you’re learning SAP PM, a mix of documentation, videos, and practical guides to get you started:
- SAP Help Portal – Plant Maintenance: Official SAP documentation covering PM processes, configuration, and concepts.
- SAP Community: Real user questions, troubleshooting, and expert answers.
- Michael Management SAP PM Training: Structured courses focused on real-world SAP PM usage.
- Udemy SAP PM Courses: Affordable beginner-to-intermediate courses with hands-on demos.
- SAP PM & EAM books: Learn how to configure and use SAP PM for repair, planning, and more.
- SAP dude and SAP Learning Hub: YouTube channels covering various aspects of SAP PM & EAM.
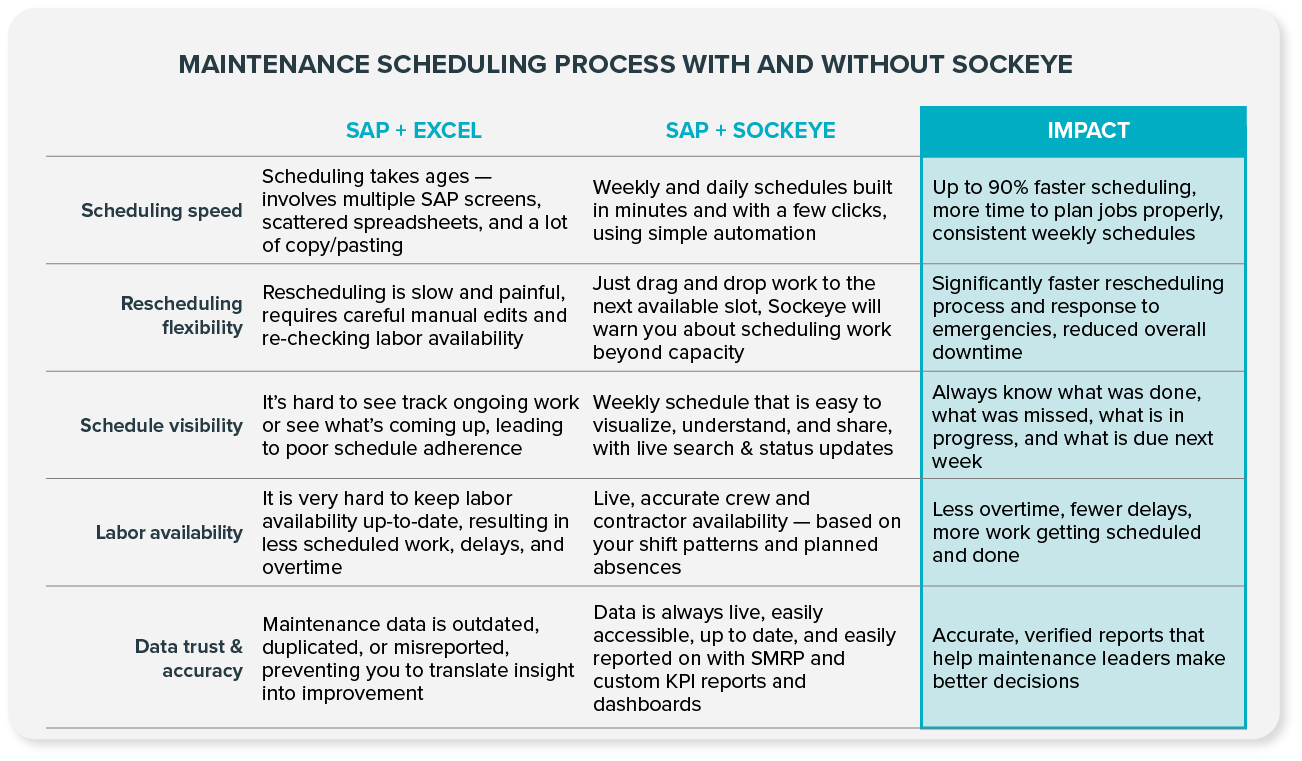
The problem with maintenance scheduling in SAP PM
While SAP PM is powerful, many teams struggle to consistently create balanced weekly schedules.
The most common complaints are pretty consistent:
- Hard to navigate: Too many tabs, fields, and screens. Important information is spread across multiple views.
- Rigid process: You must follow specific steps in a specific order. Small mistakes (like wrong status or control key) can block progress.
- Too many clicks: Simple actions often require jumping between transactions (IW31, IW32, IW38, IW41). Planners spend more time navigating than actually planning.
- Time-consuming scheduling: Limited visual tools for capacity and workload balancing. Difficult to quickly reschedule work when priorities change.
All of this leads to poor adoption. Even though SAP has the data, planners/schedulers often export everything into Excel and do scheduling there (which comes with its own set of problems).
Companies end up paying for a powerful system, only to use a portion of its functionality. If you or your team are in the same boat, there is a way to streamline the SAP PM scheduling process — and it is called Sockeye.
How Sockeye simplifies and speeds up work order scheduling in SAP PM
Sockeye is a lightweight SAP scheduling bolt-on designed to make maintenance scheduling faster, simpler, and more visual — without replacing SAP itself.
Instead of working across multiple SAP screens and spreadsheets, Sockeye gives schedulers a clear, real-time view of work orders, available labor, and schedules in one place. It’s so simple to use that it only takes schedulers a single one-hour session to learn.
Here’s what Sockeye helps you do:
- Direct integration with SAP: Works on top of your existing SAP PM setup. You get automatic syncing and no duplicate data. Changes made in SAP are visible in Sockeye, and vice versa.
- Scheduling automation: Let Sockeye match selected work with available labor — you just need to review and polish the schedule. This reduces manual scheduling effort and leaves more room for proper job planning.
- Drag-and-drop rescheduling: Move jobs between days or teams in seconds by just dragging and dropping work to the next available slot.
- Labor availability dashboard: Sockeye gives you a super simple way to view labor availability and keep it up-to-date.
- Visualize labor utilization: See utilization for teams and individuals in real-time, with visual indicators if someone is overbooked. This is critical for creating balanced schedules and reducing overtime.
If you are interested in testing Sockeye, we can set up a pilot project with minimal IT resources required. Companies use this to confirm user adoption and get a proof of concept before spending a single cent.
Learn more by jumping on a quick call with a Sockeye representative.
FAQs
SAP PM stores work order data across multiple database tables. You don’t usually interact with them directly as an end user, but they’re important for reporting, integrations, and troubleshooting.
You should release a work order only when planning is complete, materials are available (or planned), and the job is ready to be executed.
Yes — but with limitations. You can still update operations, dates, and some details. However, those changes may impact scheduling, costing, and execution.
You can choose between two primary types of integration:
- API-based integration: Sockeye uses API-based integration to adapt to every enterprise’s unique needs, providing customized read/write configurations with your SAP and HR systems. This means that any last-minute changes made in your CMMS are reflected in Sockeye — and vice versa.
- File-based Integration: Sockeye uses an Excel template to port data between SAP and Sockeye — simply export your CMMS data into Sockeye’s Excel template and click ‘refresh’ to update your data. The implementation requires minimal effort and no IT resources or custom coding.
The exact data exchanged typically includes work order details, scheduling fields, and resource info. Configurations can be customized as read-only or selective write-back to accommodate your IT/security policies.