When it comes to optimizing preventive maintenance, timing is crucial. Schedule too early, and you waste time and resources. Schedule too late, and you risk unplanned downtime.
Implementing a floating schedule can give the flexibility to find the right balance.
A floating schedule is a type of time-based scheduling where the next PM is scheduled a set number of days after the actual completion date, not the original due date.
In this article, we’ll break down how float schedules work, when to use them (and when not to), how to implement them in your PM process, and some do’s and don’ts to make sure your schedule stays effective.
The core principles of a floating maintenance schedule
A floating maintenance schedule is built around one key idea: the interval between preventive maintenance tasks stays the same, but the start point resets based on when the last task was actually completed.
In other words, every time you finish a PM job, the clock starts ticking from that date — not the originally planned date. This makes your schedule “float” forward with real-world activity, rather than sticking to a fixed calendar.
Quick example:
Let’s say you have a machine that needs an inspection every 30 days. You plan to do it on July 1st, but it gets delayed and is completed on July 5th. With a floating schedule, the next inspection is now due 30 days from July 5th — not from July 1st. The schedule adapts to what actually happened on the plant floor.
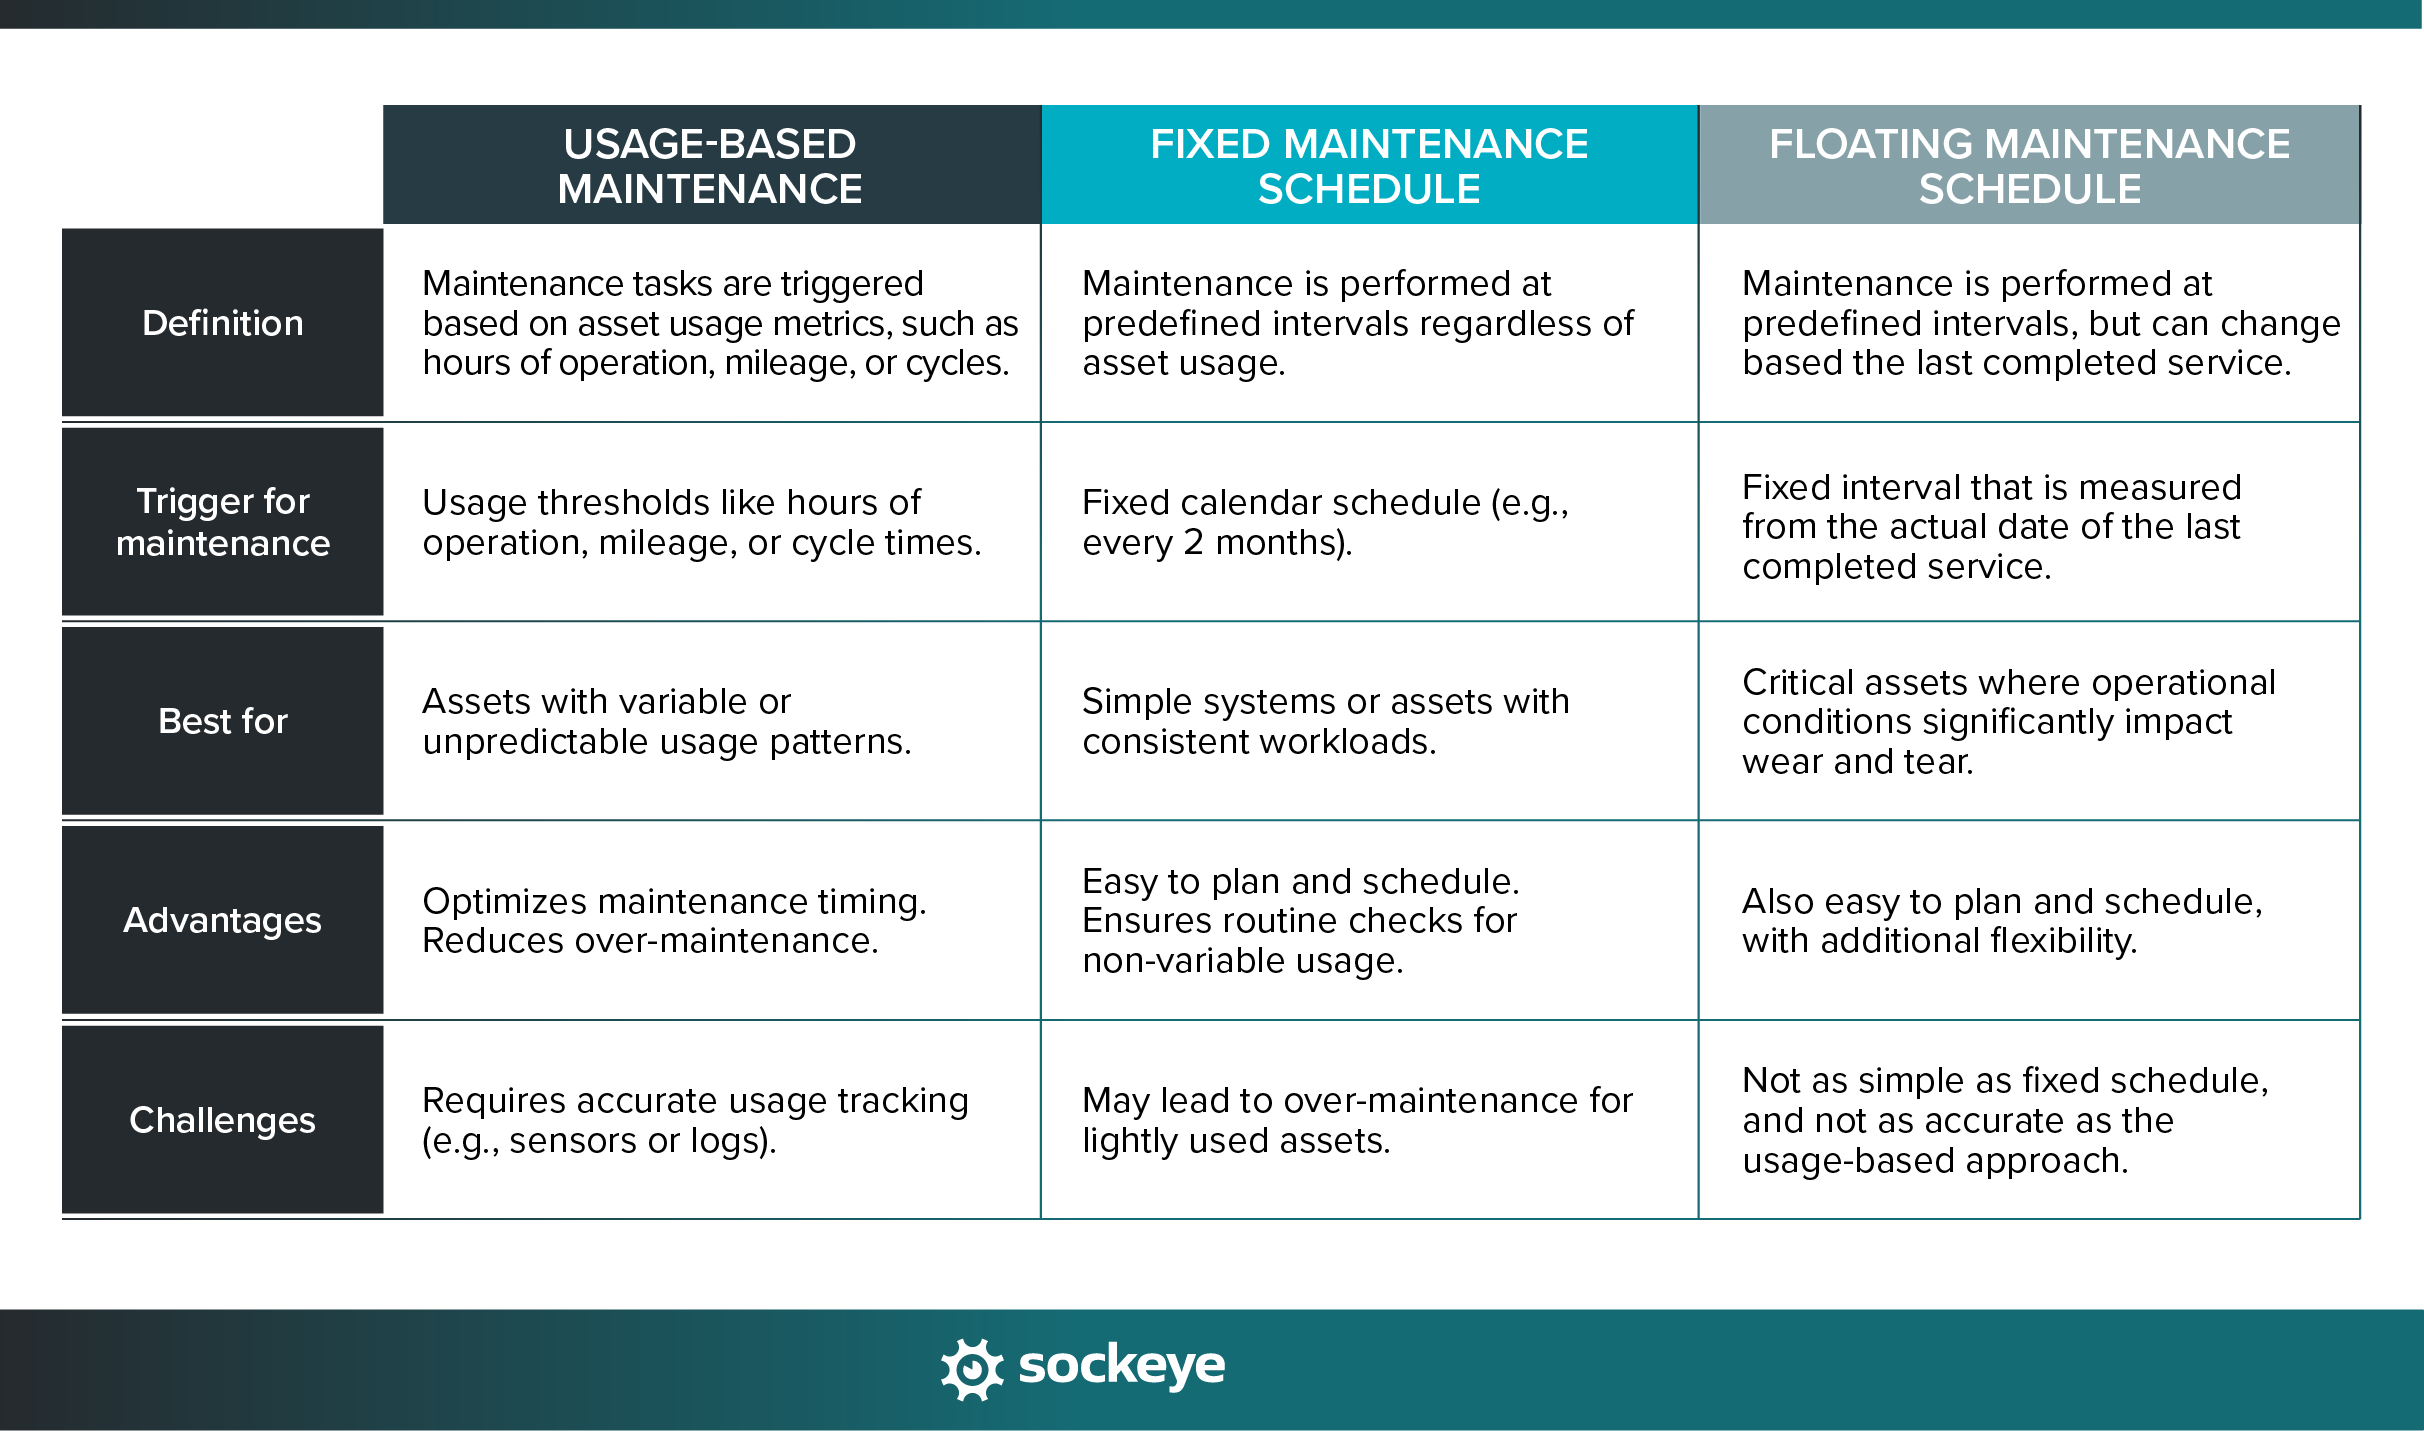
For reference, here is a quick comparison of usage-based, fixed, and floating maintenance schedules:

When and why to use a floating schedule
Floating schedules are most useful when your maintenance environment is unpredictable. If your team often has to shift PMs due to production demands, staffing shortages, and similar issues, floating intervals can help keep things on track.
When floating schedules make sense:
- Variable workloads: If maintenance teams are constantly adjusting based on production needs, a floating schedule keeps PMs spaced appropriately without piling up the backlog.
- Unpredictable downtime: If assets go down unexpectedly and PMs get rescheduled often, floating intervals help maintain consistency without forcing unrealistic catch-up schedules.
- Delayed completions: When PMs frequently get done a few days late, a fixed schedule can make the next one feel “too soon.” Floating resets the clock in a more logical way.
When not to use floating schedules:
- High-criticality equipment: For assets where failure has major safety or production impacts, it’s usually better to stick to a fixed schedule to avoid risk, or implement condition-monitoring and predictive analytics.
- Strict compliance environments: Some industries require PMs to be done on set dates for regulatory reasons.
- Tasks with tight tolerance windows: If going even a few days over a limit could cause damage or reliability issues, floating schedules aren’t the right fit.
Incorporating floating schedules in your PM planning and scheduling process
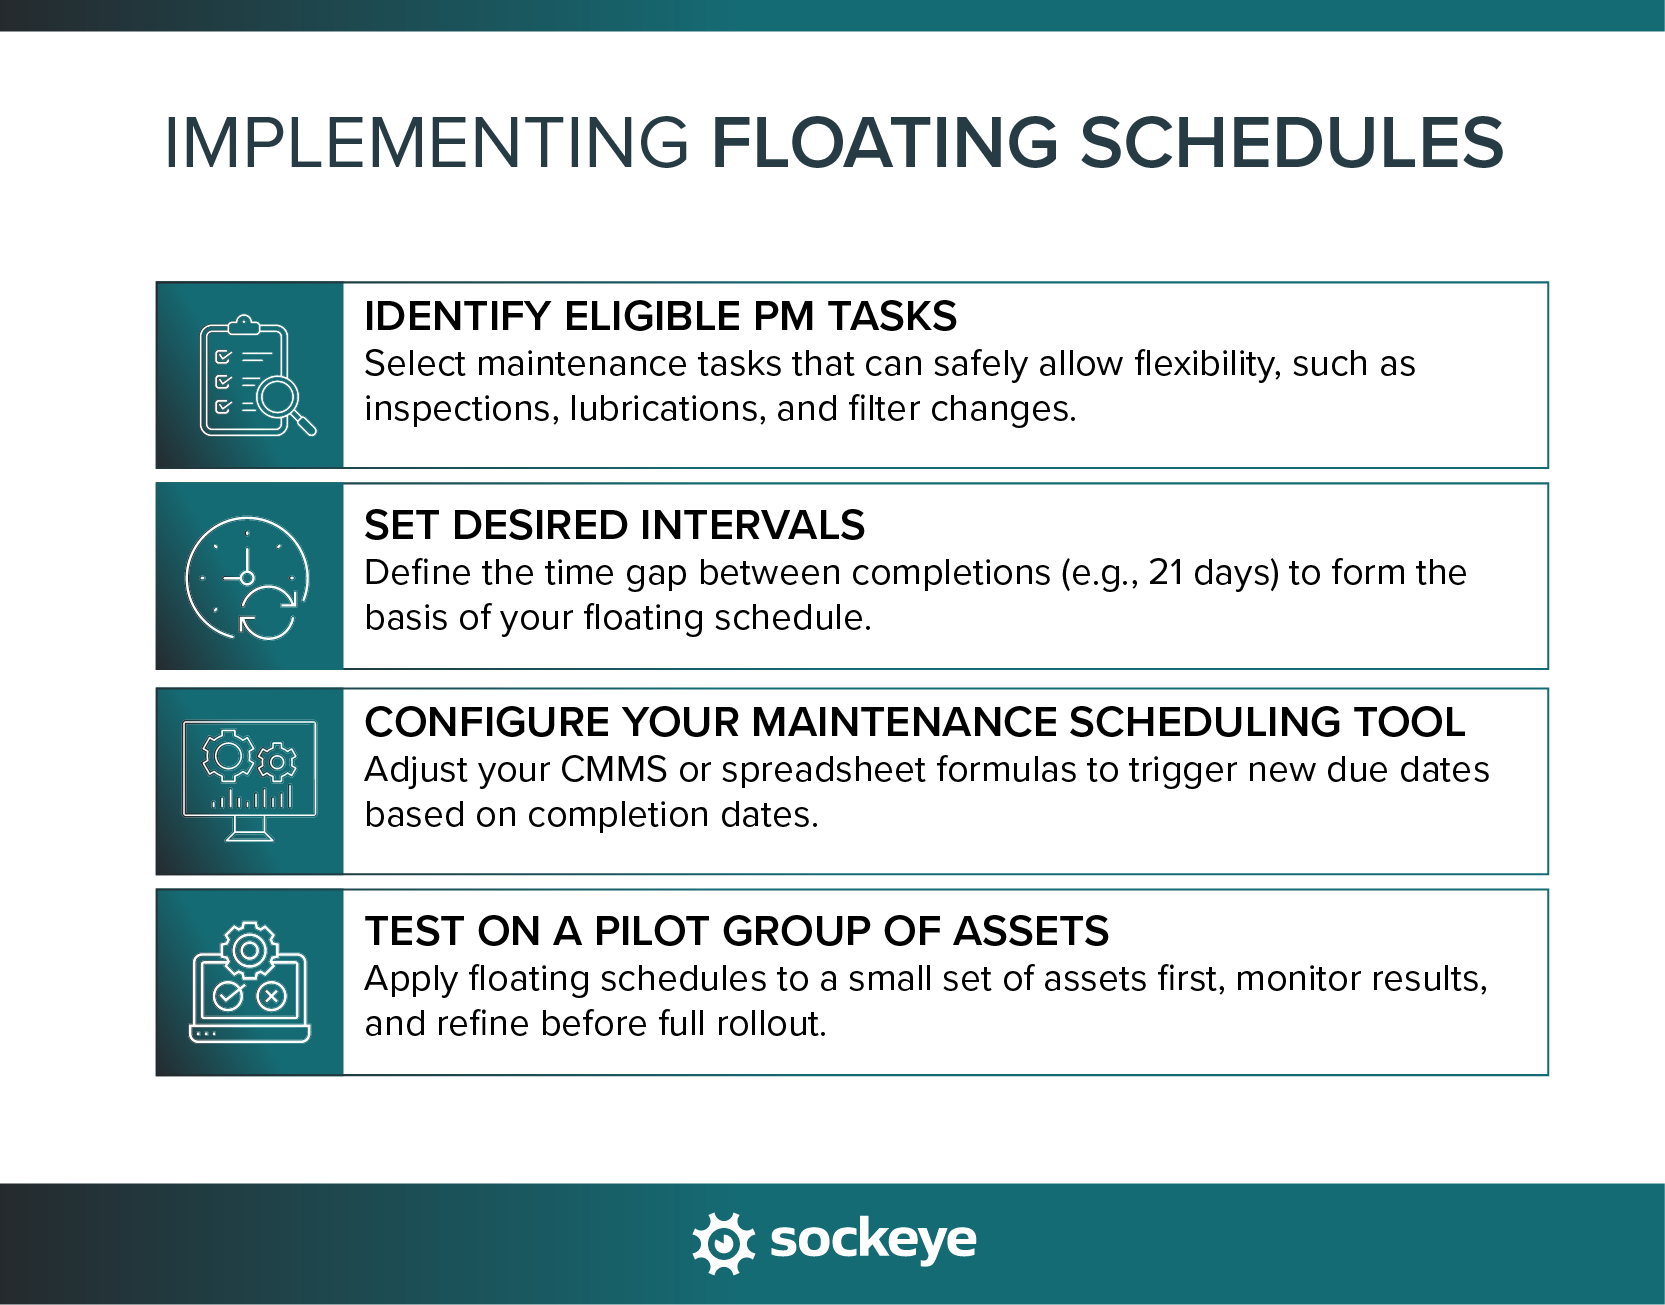
Switching to a floating schedule is fairly straightforward if you are already using a fixed schedule.

1. Identify eligible PM tasks
Start by choosing the right candidates. Focus on tasks that:
- Are low in safety or regulatory risk
- Don’t have tight tolerance windows
- Can tolerate some flexibility in timing
These will often end up being visual inspections, lubrications and greasing, filter replacements, battery checks, and other routine maintenance work.
2. Set desired intervals
Define the time interval for identified PMs — e.g., “21 days after completion.” This is the backbone of a floating schedule.
You can start with the same interval you had for your fixed schedule, or check OEM guidelines for additional guidelines. It’s a fundamental step in building any type of preventive maintenance schedule.
3. Configure your maintenance scheduling software or spreadsheet
Some CMMS platforms allow you to set PMs based on completion date. Look for options like “Next Due = X days after last completed.”
If you’re using a spreadsheet, add a formula that recalculates the next due date every time the completion date is updated.
Sidenote: If you struggle to schedule (and execute) PMs consistently, Sockeye offers a super simple preventive maintenance scheduling software that leverages automation and real-time labor availability data.
4. Test on a pilot group of assets
If you see a potential problem with this method, before going all in, test floating schedules on a handful of assets. Track how it affects workload, compliance, and backlog. Then you will have a better idea of whether you want to expand the program and which assets and tasks are a good fit for a float schedule.
Do’s and don’ts for using floating schedules
Floating schedules offer flexibility, but require discipline.
✅ Do:
- Record PM completion on the same day to keep intervals accurate: If a technician enters the completion date late (or incorrectly), the next PM will be off. Train your team to update the system immediately after finishing the job.
- Review schedule performance regularly to prevent drift: Floating schedules can slowly slip if not tracked. Check if any tasks are consistently getting delayed. If you find such, investigate why to avoid future delays.
- Use floating schedules to reduce non-value-added PMs: If you’re frequently doing PMs that find nothing wrong, floating schedules can help space them more realistically.
❌ Don’t:
- Apply floating schedules to high-criticality equipment: Assets with narrow maintenance windows, safety concerns, or regulatory requirements should stay on fixed or condition-based schedules.
- Overlap multiple PMs for the same asset without coordination: Floating PMs on different tasks (like a 30-day lubrication and a 90-day inspection) can land on the same day. That can be a problem if you haven’t planned for it.
- Forget to adjust intervals if asset wear patterns change: If equipment starts seeing more use — or less — revisit the interval. Don’t just let the same floating schedule run forever.
Track the effectiveness of your schedule with Sockeye
After implementing a float schedule, to make sure your PMs are still effective, keep an eye on a few key metrics:
- Schedule compliance rate: Are PMs still being completed on time, even with the adjusted intervals?
- Backlog size: Is your PM backlog shrinking — or growing? A floating schedule should help smooth out your workload, not bury your team.
- Asset downtime trends: If downtime increases after switching to floating PMs, it could mean the new intervals are too long or tasks are slipping through the cracks.
That’s another place Sockeye can help. It gives you real-time insights into compliance, backlog, and resource planning — so you’re not left guessing if your schedule is working.
If you are interested in learning more about Sockeye, jump on a quick exploratory call with our team.