For many maintenance teams, IBM Maximo is both a powerhouse and a headache when it comes to planning and scheduling maintenance work.
On the good side, Maximo is robust. It can handle all types of maintenance work, complex asset hierarchies, labor tracking, inventory, purchasing — everything in one system. It gives you structure, traceability, and loads of data.
On the bad side, that same depth can make planning and scheduling feel slow, rigid, and overly complex. Schedulers jump between screens. Planners wrestle with configurations. Supervisors take ages to learn how to customize reports.
In this article, we’ll break down:
- How Maximo’s planning and scheduling workflow is supposed to work.
- Where teams typically run into problems.
- And how to simplify the process without ripping out your existing Maximo setup.
For the non-initiated, let’s start with a quick overview of how planning and scheduling works inside Maximo.
An overview of Maximo Planning and Scheduling
IBM Maximo Application Suite (MAS) is a unified platform for managing assets throughout their lifecycle that integrates multiple applications and specialized modules, including a dedicated planning and scheduling capability. The purpose of this functionality is to help organizations plan preventive maintenance, organize corrective work, allocate labor and materials, and build realistic weekly schedules.

Here are the key components of planning and scheduling inside Maximo:
- Work order planning: Planners define job steps, labor hours, craft requirements, materials, tools, safety precautions, and estimated costs. This ensures work is “ready to schedule” before it hits the weekly plan.
- Job plans: You can use standardized templates that define tasks, sequences, and resource requirements for recurring jobs. These improve consistency and reduce planning time.
- Proactive maintenance management: Automatically generates work orders based on time, meter-based triggers, or information coming from condition-monitoring sensors to keep assets reliable and reduce reactive work.
- Graphical scheduling: A visual interface (a Gantt view, see example) that allows schedulers to assign work to technicians using drag-and-drop functionality, view capacity, and level resources across days or weeks.
- Scenario planning: You can build and save different versions of a schedule and then compare two of those scenarios side-by-side to evaluate the effects of changes on completion dates and resource utilization.
- Assignment manager: A tool for dispatching work and managing daily assignments, especially useful in dynamic environments where priorities shift frequently.
- Backlog and capacity management: Provides visibility into upcoming work, available labor hours, and resource constraints to support weekly and monthly planning decisions.
Of course, these are just features that help teams be disciplined about work order planning and scheduling. Maximo has many other interconnected features to optimize other aspects of maintenance and asset management (see image above).
Now let’s look at how that workflow actually plays out step by step.
Maximo’s planning and scheduling workflow
On paper, the Maximo planning and scheduling workflow is logical and structured, moving work from identification to closeout. Each role — requester, supervisor, planner, scheduler, technician — has a clearly defined responsibility.
Before we discuss potential issues with that process, here’s how that workflow typically unfolds inside Maximo.
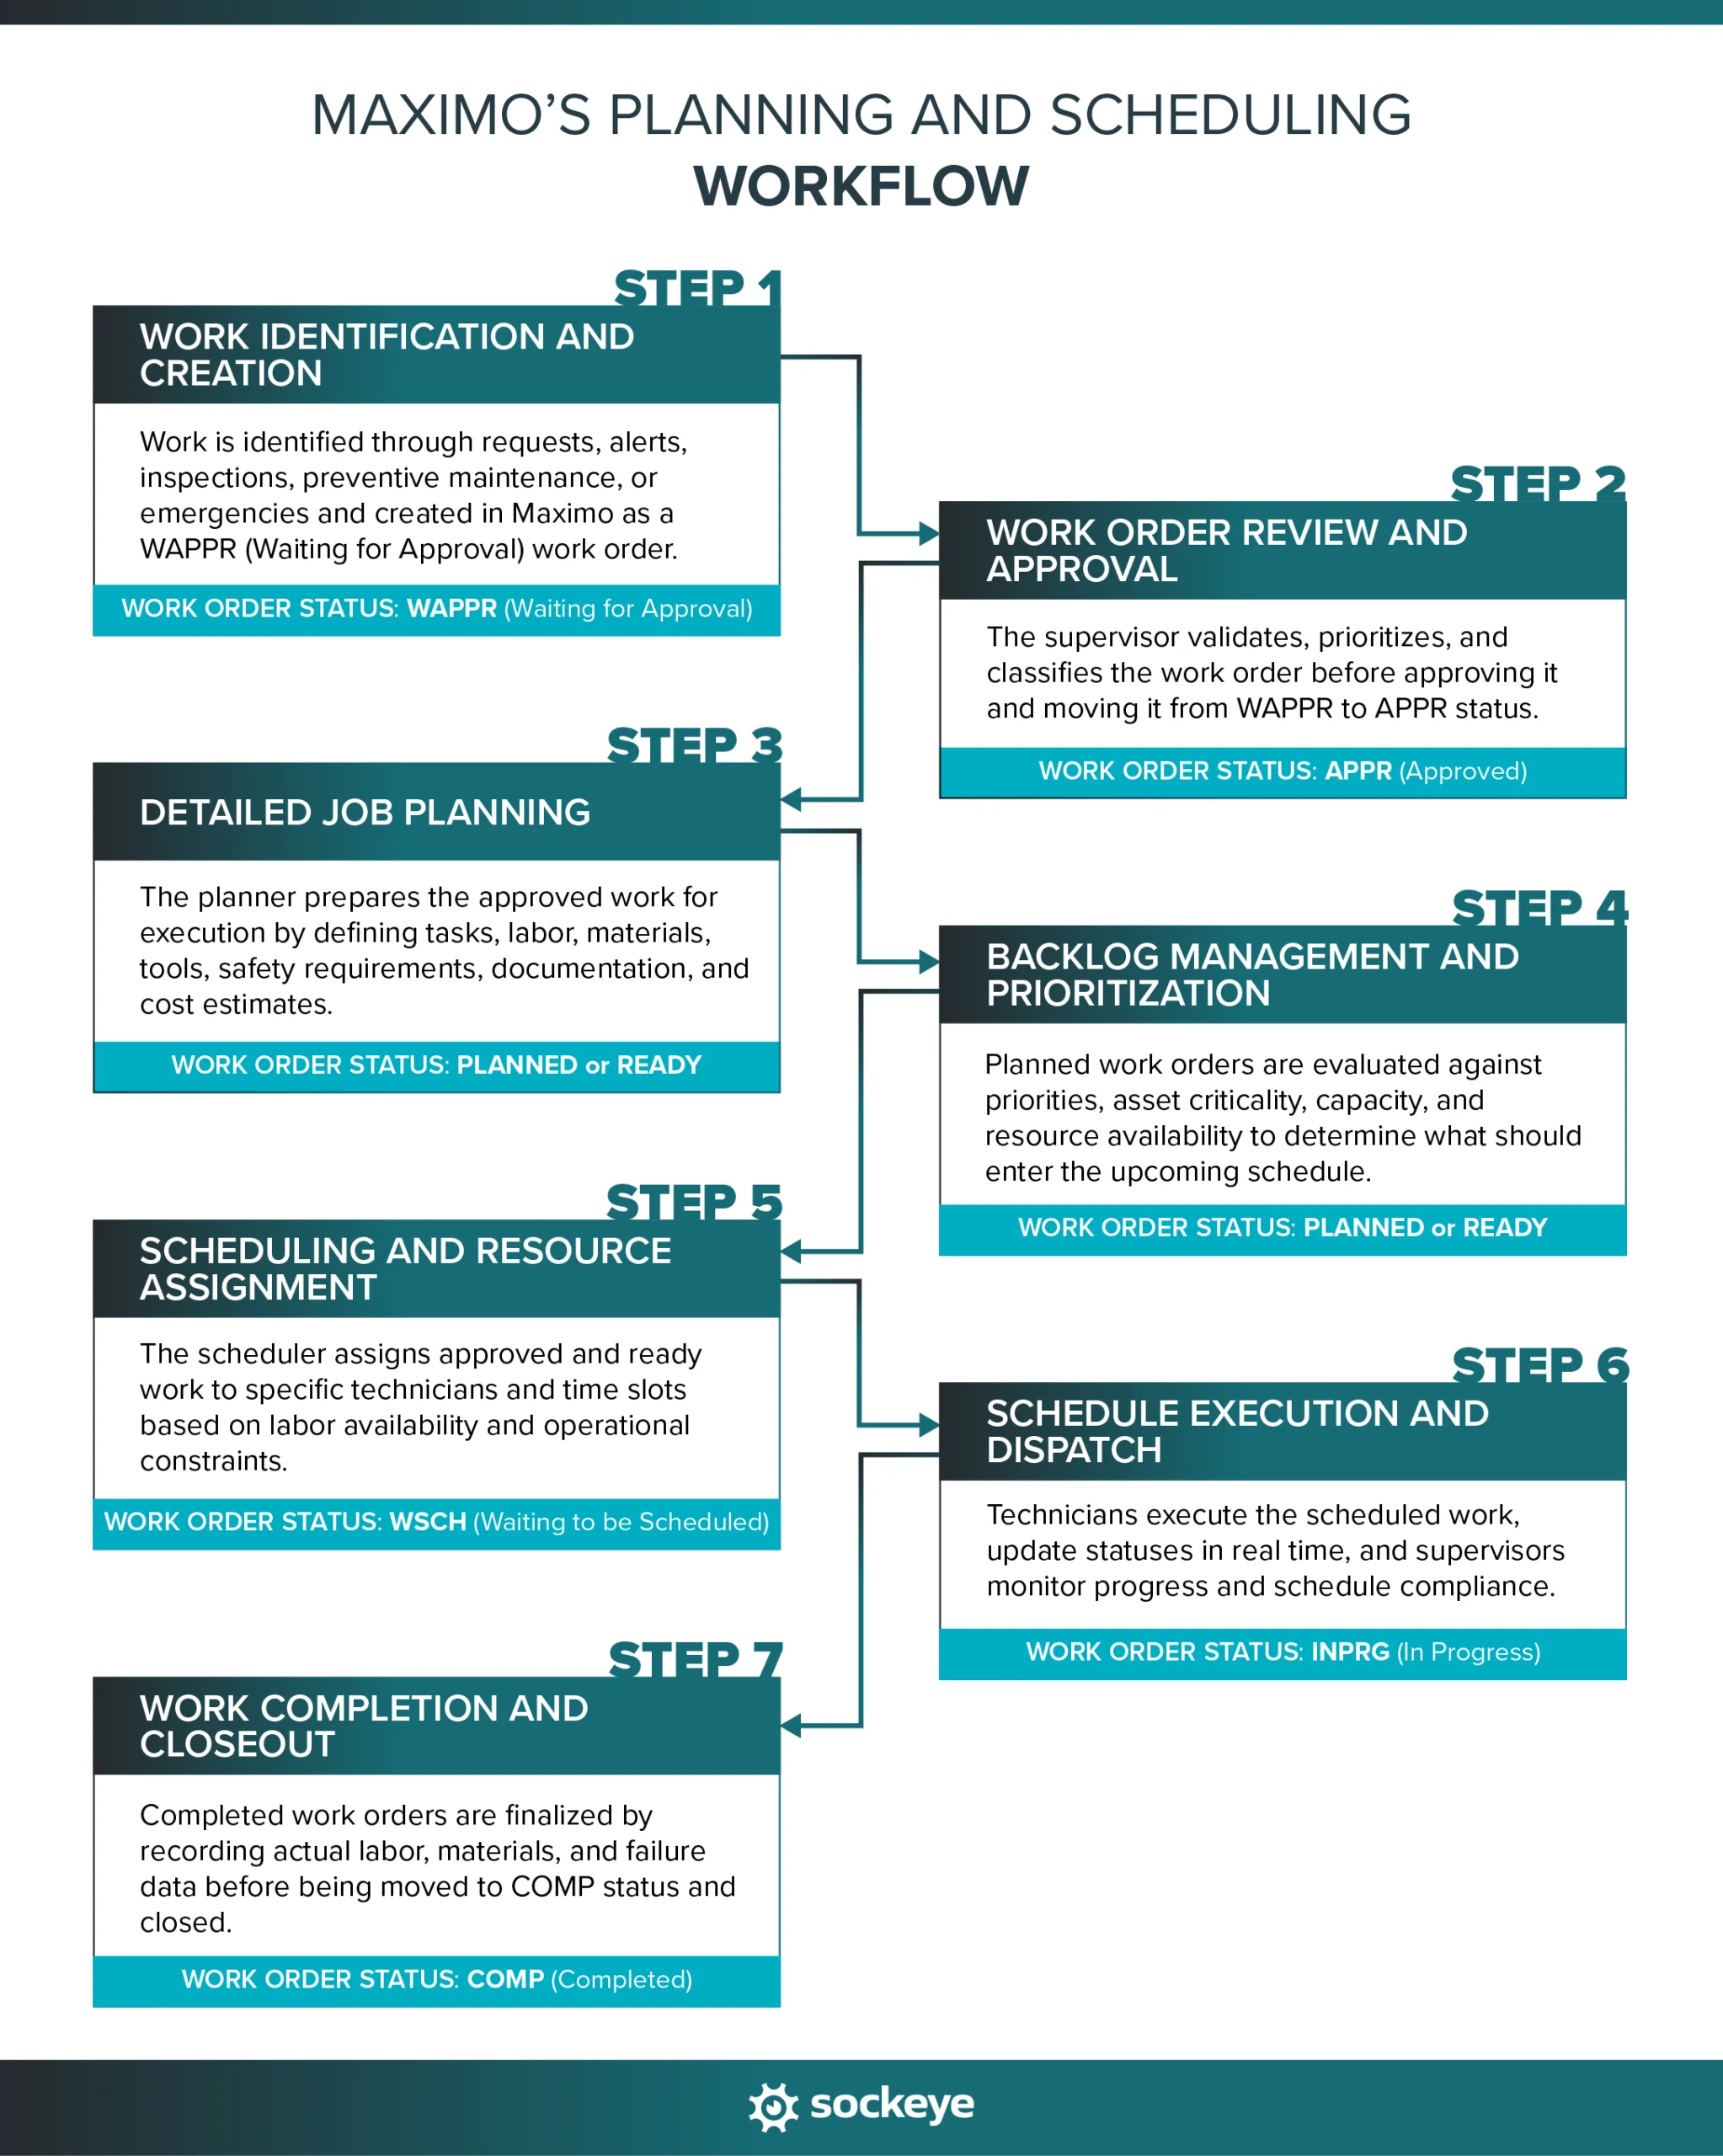
1. Work identification and creation
Every schedule starts with a work order. And every work order starts with identified work.
Work can be triggered in several ways:
- Work requests submitted manually: Operators, maintenance technicians, or reliability teams log issues directly in Maximo.
- IoT alerts and condition monitoring: Asset sensors or monitoring systems generate notifications when thresholds are exceeded.
- Inspections and rounds: Routine inspections uncover defects that require follow-up work.
- Preventive maintenance (PMs): Time-based or meter-based PMs automatically generate work orders based on predefined schedules.
- Emergency work: An alert about a safety issue or a breakdown of critical equipment that requires immediate attention.
When a work order is first created, it typically enters the system with the status: WAPPR (Waiting for Approval)
At this stage, the work exists in the system — but it hasn’t yet been reviewed, prioritized, or committed to the schedule. That review happens next.
2. Work order review and approval
Once a work order is created and sitting in WAPPR, it moves to the supervisor for review. The supervisor validates that the work is necessary, correctly described, and aligned with operational priorities.
During this review, the supervisor typically:
- Confirms the scope of work: Is the problem clearly defined? Is additional information needed?
- Sets the priority: Work orders are prioritized based on asset criticality, safety risk, production impact, or SLA commitments.
- Assigns asset and location: Ensures the work is tied to the correct asset record and functional location in Maximo.
- Applies classification codes: In Maximo, classifications are structured hierarchies that help organize and analyze work later (i.e. Electrical → Motor → Overheating). Think of them as labels that answer: What kind of work is this?
- Determines target start and completion dates: Sets expectations for planning and scheduling.
If the work is justified and ready to move forward, the supervisor approves it. The work order status changes from: WAPPR → APPR (Approved)
At this point, the job becomes eligible for detailed planning.
3. Detailed job planning
Once a work order reaches APPR, it becomes the planner’s responsibility.
This is where many organizations either win or lose control of their schedule.
The purpose of maintenance planning is to make the work “ready to execute” before it ever reaches the schedule.
A properly planned job should require minimal guesswork from the technician and minimal adjustment from the scheduler.
The maintenance planner typically:
- Defines the job plan: Breaks the work into clear tasks and sequences. If a standard Job Plan exists, it’s applied. If not, one is created.
- Estimates labor hours and craft requirements: Determines how many hours are needed and which skills (mechanical, electrical, instrumentation, etc.) are required.
- Reserves materials and spare parts: Confirms parts are available in inventory (or initiates procurement if needed).
- Identifies tools and safety requirements: Specifies special tools, permits, lockout/tagout procedures, and required PPE.
- Attaches procedures and documentation: Drawings, manuals, SOPs, checklists, or OEM instructions are linked to the work order.
- Estimates cost: Labor, materials, and any external services can be forecasted for budgeting and tracking.
At this stage, some organization like to add a custom WO status to signify that the work order has been planned (something like PLANNED or READY).
Next comes backlog management — where priorities, capacity, and reality collide.
4. Backlog management and prioritization
Once work is fully planned, it moves into the planning backlog.
The backlog isn’t just a holding area — it’s a control point. It allows maintenance teams to separate approved work from scheduled work and decide what actually gets done next.
Work orders in the backlog are typically grouped and filtered by:
- Priority
- Asset criticality
- Craft or labor type
- Location or production line
- Target dates or SLA commitments
Most organizations hold a weekly planning meeting to review the backlog and decide what enters the next schedule period.
During that review, teams might evaluate:
- How many productive hours are realistically available next week?
- Which assets cannot afford failure?
- What absolutely must be completed based on our SLAs and regulatory deadlines?
- Are all required parts, tools, and materials in stock?
The outcome of this step is a shortlist of work that is ready, prioritized, and feasible. That shortlist becomes the input for scheduling.
5. Scheduling and resource assignment
This is where a maintenance scheduler takes over — and where the process often causes the highest amount of friction.
At this point, the question shifts from “What should we do?” to “Who is doing it, and when?”
Using the scheduling tools in IBM Maximo, the scheduler builds the weekly (or daily) plan.
Typical activities include:
- Viewing labor availability calendars: Understanding shift patterns, vacations, training days, and existing commitments.
- Scheduling work: Assigning planned work to specific individuals or teams.
- Performing resource leveling: Switching between multiple screens and data points to try to create a balanced schedule between teams and shifts.
- Sequencing work logically: Where possible, grouping jobs by area, asset, or craft to reduce travel time and inefficiencies.
- Locking the weekly schedule: Freezing the agreed plan so it can be executed without constant reshuffling.
When the scheduler commits work to a schedule, somme organization create a custom WO status change to something like: WSCH (Waiting to be Scheduled).
In theory, this step should be straightforward: take ready-to-go work and assign it to available labor.
In practice, this is often where teams feel friction — having to go through many screens and clicks to do even a simple task like rescheduling a work order.
6. Schedule execution and dispatch
Once the weekly schedule is locked, the focus shifts to execution.
Technicians receive their assignments and begin work according to the plan. Depending on your Maximo setup, this can happen through printed job packets, desktop access, or mobile devices.
During execution:
- Technicians receive their assigned work: Including job steps, safety instructions, parts, and documentation.
- Work status is updated in real time: Status changes such as INPRG (In Progress), waiting on parts, or completed are recorded directly in the system.
- Mobile integration (if enabled): Allows technicians to log labor hours, record failure codes, and capture notes or photos directly from the field.
- Supervisors monitor progress: They track schedule compliance, labor utilization, and emerging issues.
Once work is completed, it moves into the final stage: closeout.
7. Work completion and closeout
The final step in the Maximo planning and scheduling workflow is closing the loop.
Once technicians finish the job, the work order moves into completion and closeout. It’s how valuable data is captured for future planning and reliability improvement.
During this stage:
- Labor hours are recorded: Actual hours are entered against the work order, allowing comparison with planned estimates.
- Materials consumed are issued: Spare parts and consumables are logged, updating inventory and cost tracking.
- Failure codes are captured: The cause, problem, and remedy codes are entered to support root cause analysis and long-term reliability tracking.
- Notes and documentation are finalized: Technicians may add completion comments, photos, or recommendations.
With that, the work order status changes to COMP (Completed): The job is officially closed and removed from the active schedule.
On paper, this workflow is structured and logical. But in practice, many maintenance teams find that the scheduling portion becomes the bottleneck.
Let’s look at why.
The problem with Maximo’s scheduling process
The problem is not in Maximo’s lack of capability — it’s just that using it efficiently takes too much time, configuration, and discipline.
Here are the most common complaints we hear about:
- Steep learning curve: Maximo has a lot of options, fields, and configuration settings. New planners and schedulers take months to become fully comfortable. Their graphical scheduler alone takes 3 whole days of training.
- Heavy setup requirements: For scheduling to work properly, labor calendars, shift patterns, crafts, skills, job plans, and statuses all need to be configured correctly. If one piece is off, the schedule becomes unreliable.
- Rigid workflow structure: The system enforces process discipline — which is good in theory — but slows things down, especially if you are missing required info or doing something non-standard.
- Multiple screens and navigation steps: Scheduling and rescheduling often requires dozens of clicks while moving between work order tracking, graphical scheduling, assignment manager, and labor views.
- Limited visibility into true capacity constraints: Without clean availability data and tight configuration, schedulers can easily over-commit resources.
- Slow rescheduling process: When plans change, updating assignments and rebalancing labor can take way longer than expected.
Over time, these friction points create real operational consequences.
Backlogs grow because scheduling takes too long. Supervisors rely on overtime to catch up. Preventive maintenance gets pushed out. Technicians lose confidence in the schedule.
And perhaps most importantly — teams start working around the system instead of through it. Which is a huge waste for a system as expensive as Maximo is.
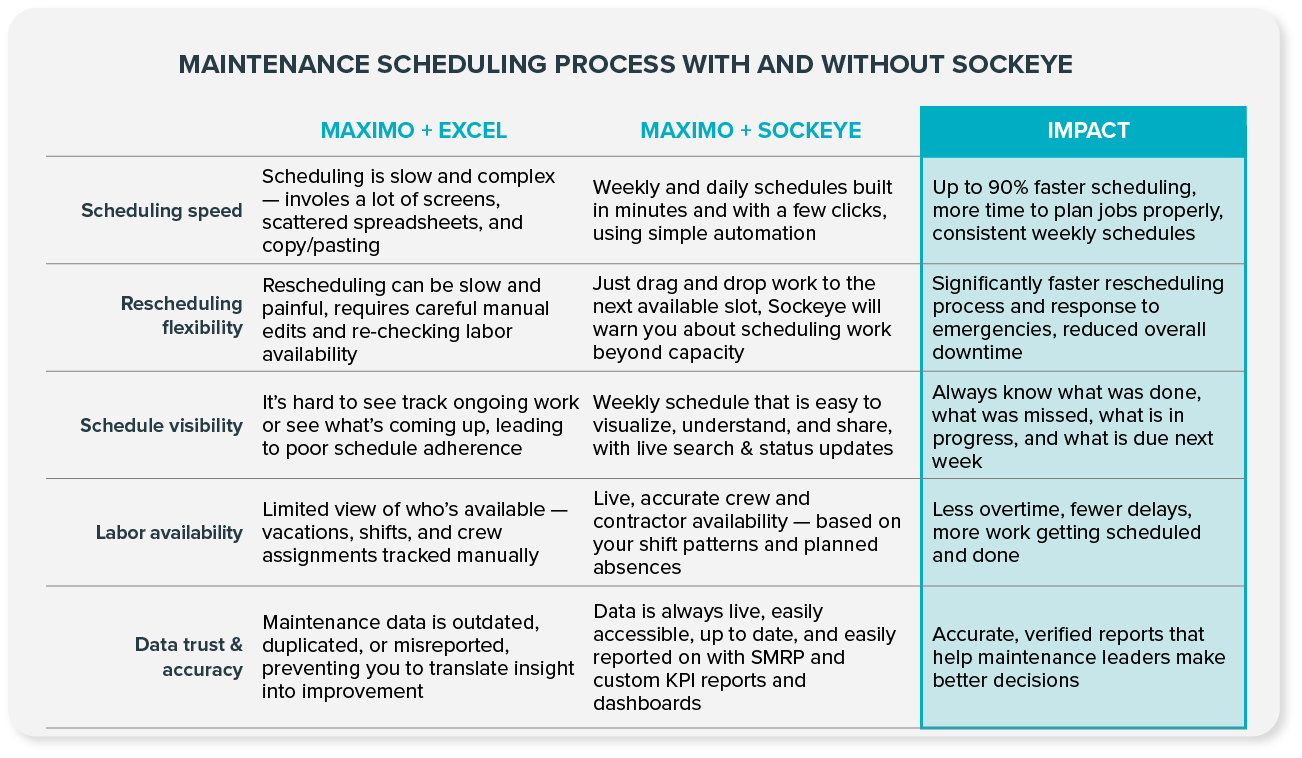
How Sockeye eliminates these issues
When scheduling inside IBM Maximo start taking too much time, many maintenance teams quietly fall back on what they know: Excel. They export work orders, build their weekly plan outside the system, and then manually update Maximo later.
It feels faster in the moment — but it creates new problems: duplicate data entry, version control issues, no real-time visibility, misalignment between schedule and system, and loss of historical scheduling data.
That’s exactly the gap Sockeye was created to solve.
Sockeye is a scheduling and reporting bolt-on built for Maximo. Its purpose is to make scheduling and rescheduling fast, visual, and intuitive — without disrupting your existing Maximo workflows.
You keep the power and data integrity of Maximo. But you remove the friction that slows down scheduling. Plus, you don’t need to overhaul your processes or spend weeks training. Sockeye is designed to slot right into your existing setup and start delivering value almost immediately. It actually helps you squeeze more value out of your investment in the IBM Maximo Application Suite.
Take the Aditya Birla Group as an example. Sockeye integrated with their existing Maximo solution to automate data entry, simplify scheduling with drag-and-drop functionality, and allow precise labor availability and utilization tracking. This helped them reduce overtime, expedite payroll, and improve production uptime.
“What used to take me up to five days of work can now be done with Sockeye in just under an hour. Because Sockeye synchronizes the data directly from our CMMS, we know the information is valid and trustworthy. When our guys get to the stores, we know that the parts ordered have been activated. We can also trust the data in Sockeye for payroll. With just three keystrokes, we pay 75 people.”
Todd Hicks, Planning and Shutdown Superintendent AT THE AV GROUP
Test Sockeye on a quick pilot project
Want to see how Sockeye works with your Maximo setup? You don’t have to guess — take our free 30-day trial. It’s designed to help you get a proof of concept and requires no resources from your IT department.
Here’s how to get started:
- Book a demo: Chat with the Sockeye team and see the platform in action.
- Set up your trial: Test drive Sockeye using a file-based integration (Excel). This requires no investment or IT resources — just your shift patterns and one hour from your scheduler.
- Plan a real project: We can connect Sockeye to your Maximo environment so you can use it on an actual set of work orders.
- Track the difference: Measure time saved, visibility gained, and how much easier scheduling becomes.
- Decide what’s next: After the trial period, you’ll know whether Sockeye is a good fit.